I really hate to waste anything. I usually wear my garments to the point where they are no longer functional. So, taking them to the thrift store often doesn't make a lot of sense. They can no longer be put up for sale.
That means that I have a huge plastic storage bin full of old clothes or scraps of old clothes. I pay a lot of attention to the colors and materials of the attire that I buy, so all of the scraps are perfect for repurchasing into new items. They already fit with my style.
I have had an old red shirt around for a while, which I hadn't found a use for. But lately with it being so cold outside, I realized that I needed a new pair of mittens. It occurred to me that the shirt would be perfect for this project.
The red color looks festive for the holiday season, and the material is nice and warm.
S,o I set about making my new mittens a reality. I filmed it as a video tutorial so that you can follow along and make a pair of mittens of your own!
Video Tutorial:
You do not need a lot of supplies for this project, which is one of the reasons that I'm so happy to share it with you. You probably already have most of what you need.
The lace that I mentioned in the materials list is optional, but it makes a lovely embellishment and gives the mittens a more "finished" appearance.
As for the old shirt that you use, I recommend, if possible, that you pick one that has an elastic cuff at the bottom. That way, you can cut the mittens from the bottom and have that same elastic cuff around your wrists just as you would get with store-bought mittens.
This is very helpful not only in holding in heat but also in keeping out snow.
What if you don't have that? That is okay—you can still enjoy making this winter craft project out of a different shirt. If you are talented with a needle and thread, you may be able to purchase elastic separately and stitch it in.
Otherwise, you can just skip out on the cuffs altogether. You will still have warm mittens.
Note that you do not necessarily need a shirt for this project, either. You can also make it out of an old skirt or blanket or any other sufficiently large piece of cloth.
Ready to get started? Read the materials and tools lists below, and check out the video and written instructions. Even if you are a beginner at sewing, you should find this easy sewing project very approachable.
How to Make a Pair of Warm Mittens Out of an Old Shirt

Want a pair of cozy mittens for the winter, but don't want to just go to the store and buy some? It's a lot more fun to make your own, and it is also a lot thriftier. Watch my new video tutorial to learn how to turn an old shirt into new pair of warm mittens.
Materials
- Old shirt (can be a sweatshirt, sweater, or whatever—pick something warm and cozy)
- Lace
- Thread
Tools
- Scissors
- Pen
Instructions
- Lay the shirt you have chosen out flat on your work surface.
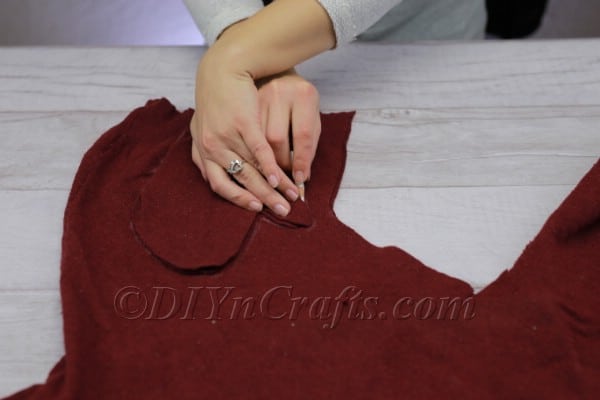
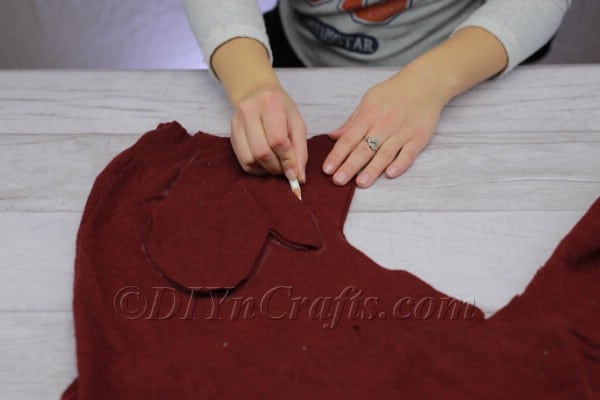
- Use a pen to trace the outline of your hand. Don't worry about the pen marks; they will not be there on the finished mittens.
- As I mentioned before, if you can find a shirt with an elastic cuff, you want to start your mittens down there at the bottom with the cuff around the wrist.
- When you are tracing the outline, do not trace too close to your hand. Give yourself a little extra distance. Remember, we are making mittens, not gloves, so there is no need for precision around your fingers. Just get the approximate right shape.
- If you take a look at the picture or watch the video closely, you can get a feel for how much distance you should give yourself around your hand as you trace.
- Using a pair of scissors, cut out the mitten around the outlines. Make sure that you go down two layers, cutting out both the front and back of the shirt. These two pieces will be the top and bottom of the mitten.
- Now you need to make the second mitten. To do this, simply take the first one and set it down on top of the shirt in another spot so you can trace around it to create a duplicate. Remember to do this again at the bottom of the shirt so you can take advantage of the elastic cuff.
- Once again, cut around the outlines, going through both layers of the shirt so that you have the top and bottom of your second mitten.
- Now it is time to stitch the mittens. Pick either mitten you like to start with, and just start stitching at one of the bottom corners and work your way around the entire perimeter down to the other one. Leave the bottom open as this is where your wrist will slide in.
- Do the same thing with the other mitten.
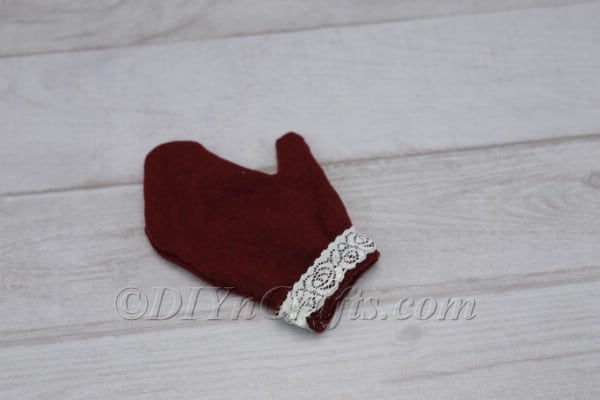
- Once you have stitched both of the mittens, turn them inside out to hide the stitches. If the elastic cuffs at the bottoms of the mittens are long, you can choose to fold them up if you want (I ended up doing this).
- At this point, if you want, you can call the project complete. You have a pair of comfortable and functional mittens to take out in the winter weather. But I decided to do one more step.
- If you have a strip of lace which is the appropriate width, stitch it onto the base of each mitten around the cuff. This simple decorative accent adds an elegant touch to your finished mittens.
Recommended Products
As an Amazon Associate and member of other affiliate programs, I earn from qualifying purchases.
Keep Your Hands Warm and Dry Through the Coldest Winter Days This Holiday Season
You have now created your very own pair of handcrafted mittens out of an old shirt. You've made good use of old material and have given it new life in a form that should serve you well over the holiday season and throughout the rest of winter.
A pair of handmade mittens can also make a great Christmas gift for someone on your list. The nice thing about mittens is that it is easier to make them one-size-fits-all than it would be if you were trying to create gloves.
If working on this project has you in the mood to do some more sewing, there are a lot of great projects for you to check out on our site which are perfect for this season.
You can start out by learning how to make stylish scarves to go with your new mittens. If you're looking for more handcrafted gift ideas, here are some that you can sew this holiday season. Finally, now that you know how to make a pair of mittens, you may want to learn how to make oven mitts and potholders. Have fun crafting!








Leave a Reply