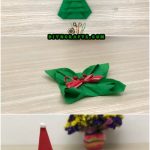
Getting ready to host a Christmas party? Stand out with these easy-to-do Christmas napkin folding projects! The holidays are upon us. While we still have Halloween and Thanksgiving to look forward to, Christmas will be here sooner than you think.
To celebrate Halloween, try making some of these delicious candy recipes, and then get ready for Thanksgiving with these creative crafts for kids. And then make your table festive for Christmas with these fast, fun, and easy napkin-folding crafts!
Materials:
- Napkins in green, red, and white
- Hot glue and glue gun
- Googly eyes
- Bows, snowflakes, and other Christmas embellishments
Steps:
Santa Napkin
1. Start with a red napkin. Fold the edges inward to form a kite shape as shown in the video.
2. Turn the red napkin over and grab a white one.
3. Fold the white napkin in half to form a triangle shape.
4. Wrap the white napkin around the red one.
5. Get some googly eyes and glue them to the “face.”
6. Get a little cotton ball and glue it to the top of the “hat.”
You now have an adorable Santa napkin!
Tree Napkin
1. Start out with several green napkins. Set them one on top of the other.
2. Start folding up the bottom of each one to create the levels of the “tree.”
3. Turn it over and fold in the edges.
4. Turn it back over again. The next step is tricky to explain in words, so I suggest watching the video if you can. You need to take each of the corners hanging down in the middle and fold them up and tuck them into the layer above. This gives you the tree shape.
5. Embellish the tree as you see fit. A red bow provides some nice contrast and gives it a more festive feel.
You now have an amazing paper napkin Christmas tree!
Fancy Napkin
1. Begin with a green square of paper and fold it in half one way, and then the other, forming a smaller square. Then unfold it.
2. Fold the corners inward toward the center. Press down to flatten it.
3. Turn it over, and now fold in the corners toward the center once again.
4. Pull up on each of the corners and “poof” them out to form shapes like petals. This is really impossible to describe using words alone, so check the pictures and the video to see how it is done.
5. Add whatever embellishments you want to the center to make it more festive. And voila, you are done!
Elf Boot Napkins
1. Begin with a green square of paper. Fold it in half in both directions and then open it up again, flattening it out.
2. Fold the top edge down toward the middle, and do the same with the bottom edge. Then fold the entire thing in half lengthwise.
3. Fold both sides up along the centerline.
4. Fold both edges in toward the center.
5. Fold it in half. Then unfold it. Then fold one of the inner edges inward away from the center. Wrap this around and insert it into the “pocket” near the tip. Yes, this is basically impossible to describe in words. The video makes it all clear and easy.
6. Finally, invert the open end, which becomes the open end of the “boot.”
Make a pair of these, and you have a cute pair of paper boots which would be perfect for any of Santa’s little helpers!
Christmas Hat Napkin
1. Fold a red square of paper in half twice to form a smaller square.
2. Fold in the bottom corner not quite as far as the center.
3. Fold in the edges and glue them into place to form a triangle.
4. Glue a cotton ball to the tip of the hat.
5. Add a snowflake or any other embellishment you want, and you have a cute Christmas hat!
I hope you enjoyed these easy Christmas origami crafts! Use them to fold napkins for guests at your next Christmas party, or just do them with paper and have fun!


Colette Rodriguez
Adorable