I have a HUGE jewelry collection. Seriously, everyone I know comments on it. Of course, it’s probably partly because I am always making my own jewelry with cool DIY projects like these.

But when it comes to organizing and storing my jewelry, I have always been at a bit of a loss. I have made some organizers in the past using some of these projects, but a lot of them took up more space than I wanted, so I have never stopped looking for an idea for compact wall storage—and now I have found one!
In fact, I have an exclusive video to share with you. Check it out!
Subscribe to our YouTube channel here.
Materials:
Amazon.com affiliate links.
Two pieces of cardboard
Mesh
Scissors
Glue
Ribbon
Twine
Any decorative elements you want to add

Directions:
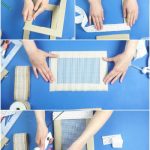
1. Cut out two frames from cardboard. They need to be the exact same size since they will fit front-to-back. You can use a triangle to help you get the edges straight and the angles right.


2. Use ribbon, lace, or any other decorative material you want to cover the cardboard.

3. Use your glue gun to sandwich the mesh inside the two frames.


4. Glue twine at the top so you can hang the organizer and finish off the project with any other decorative elements you want to add.


Your new jewelry organizer is ready to use!


Leave a Reply