How do you organize all those bits and bobs you have lying around the house? There’s always the option of buying a thousand plastic storage totes, but maybe you don’t have to.
Maybe you already have what you need right at home. In fact, some of the disorganized items you have strewn around right now could be exactly what you need to corral the rest of the chaos.
Check out these 85 clever organizing hacks to get all your stuff in order!
Jump to:
- Tack your plastic bags to the inside of your pantry.
- Bring out those magazine holders again!
- Make a tea tin with dividers.
- Keep your veggies in a drawer.
- Install tension rods.
- Use a pegboard organizer in your drawers.
- Store your K-Cups in an egg carton.
- Make your own chip clips.
- Organize cookie cutters with a paper towel rack.
- Get a rotating food tray.
- Label ingredients with chalkboard paint.
- Make your own tie holder.
- Organize underwear in PVC pipes.
- Use a letter organizer for your flip flops and sandals.
- Time to bring out the corkboard again!
- Stop your clothes from falling off your hangars.
- Store your shoes the easy way.
- Create a DIY cable box.
- Ohuhu Travel Organizers
- Put your cords inside toilet paper tubes.
- Label your cords.
- Use plastic bread tags.
- Neatly conceal your power cord in a shoebox.
- Run your cords through binder clips.
- Create a family charging station.
- Shoe organizer to the rescue (again)!
- Turn a used lotion bottle into a beautiful holder for charging a cell phone.
- Use a carabiner to get your hair ties organized.
- Use a spice rack to display your perfume bottles.
- Store makeup brushes in a toothbrush holder.
- Fill a vase with coffee beans for your brushes.
- Use a kitchen utensil tray.
- Use an old wooden hangar to store your necklaces.
- Or … try a corkboard!
- Jewelry travel solution: pill box!
- Use a magazine holder in an unconventional way.
- Use hanging shoe organizers for just about everything.
- Store your makeup palettes with a desk file organizer.
- Magnetize it.
- Use magnetic tape to hold bobby pins and other small metallic items.
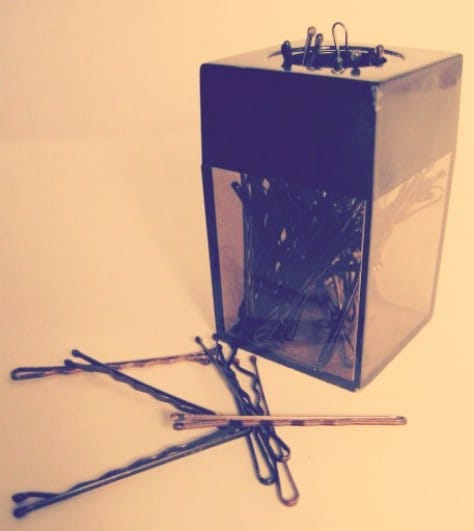
- Use a paperclip holder instead.
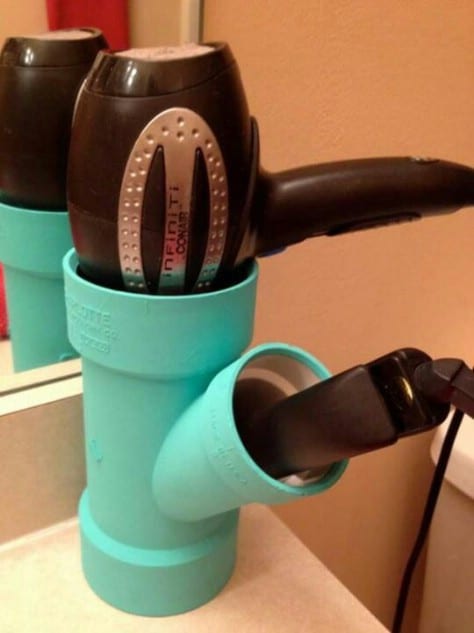
- Store your hairdryer in a PVC pipe.
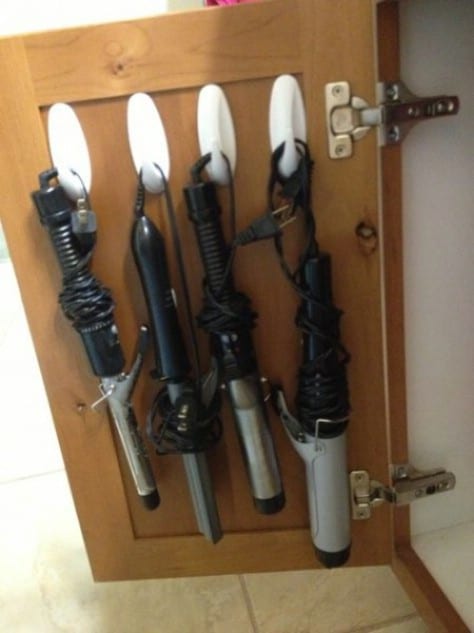
- Use the inside of your cabinet doors.
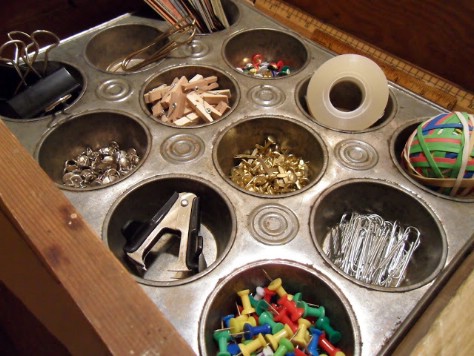
- Use an old muffin tin.
- Try using drawer dividers.
- Stack Mason jars.
- Make an empty tin can organizer.
- Use a shoe box and toilet paper rolls.
- Store pens upright in cork trivets.
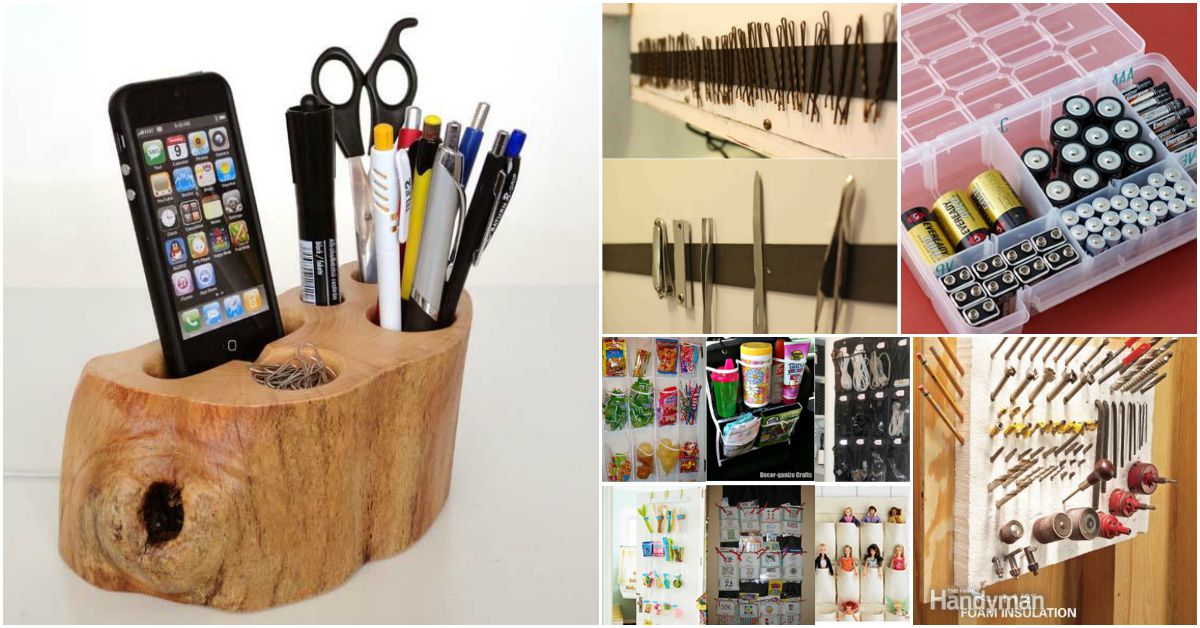
- Create an organizer out of a tree stump.
- Organize your supplies into Altoids tins.
- Organize your schedule on a clothesline.
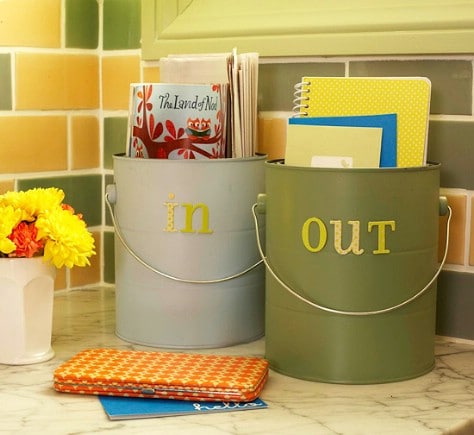
- Use pails for incoming and outgoing mail, tasks, etc.
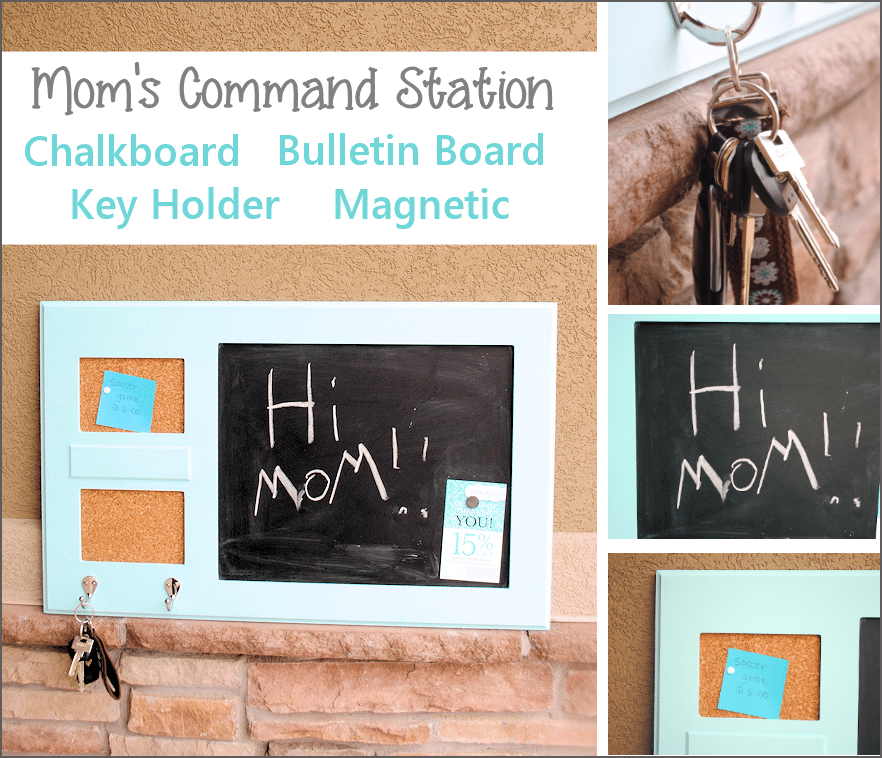
- Keep the Family Organized with This Great DIY Command Station
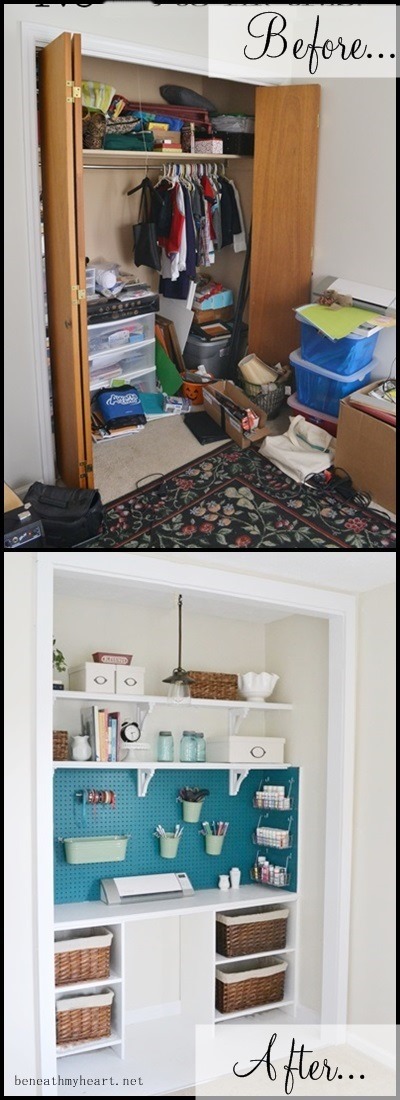
- Redo Your Craft Closet with This Easy DIY Project
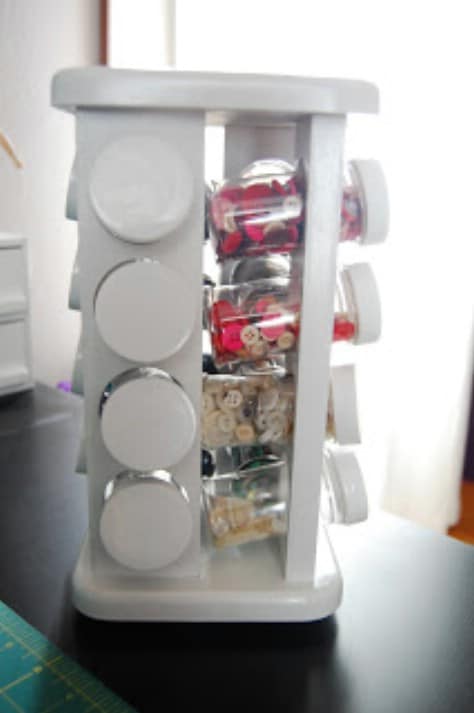
- Use a spice rack holder for craft supplies.
- Use a wine rack to store your yarn.
- Store craft supplies in vintage candy jars.
- Make a ribbon holder use curtain rods and lengths of chain.
- Store glitter in salt shakers.
- Put twine in a sugar dispenser.
- Or … use a Mason jar.
- Store twine using a picture frame.
- Use old plastic bottles to store ribbon, twine, or whatever else.
- Store knitting needles in a binder.
- Hang your scrapbooking supplies in a closet.
- Use tick Tic Tac containers for ribbons.
- Store documents in a notebook.
- Store plush toys using a shoe organizer.
- Build a plush animal “swing.”
- Use a ladder with baskets to store stuffed animals and other toys.
- Try some bungee cord storage.
- Store bath toys the easy way.
- Repurpose a plant hanger for children’s toys.
- Keep game board pieces in their places.
- Store plush animals in a bean bag cover.
- Put pictures on plastic bins so that children understand where to put their toys.
- Label cubbies or bins with letters so children can learn.
- Organize kids’ stuff (or your stuff!) on a road trip.
- Display your kids’ artwork on clipboards.
- Create a “pincushion” for your tools.
- Mount paint swatches on a hook.
- Recycle your tin cans.
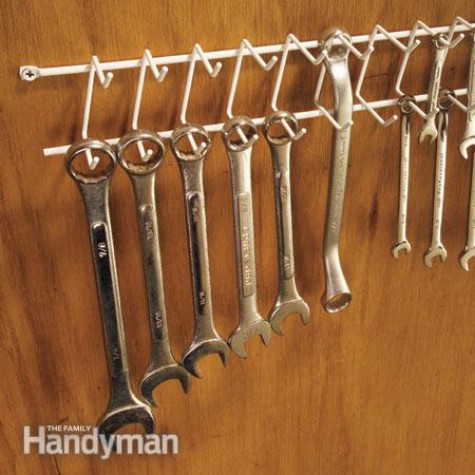
- Use a belt rack for your wrenches.
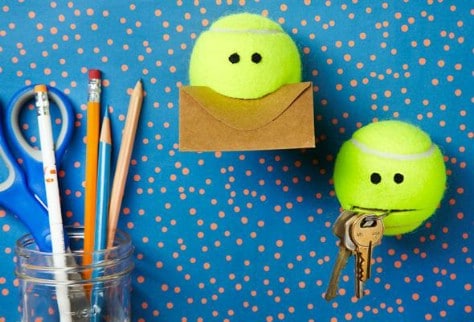
- Get these adorable tennis balls to hold your keys and other loose items.
Organize Your Kitchen
The kitchen is another room in the house where you have a lot of small items that can be tough to keep in order.
Spice jars, partially eaten bags of food, plastic bags, dishware … all of it can be so hard to keep organized and neat! Try these hacks to give your kitchen a total makeover.
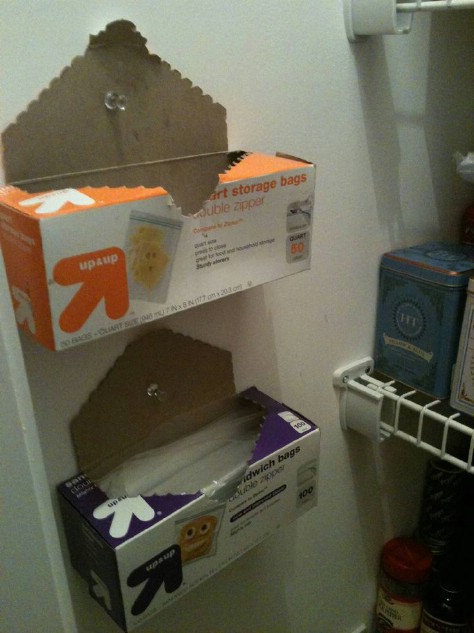
Tack your plastic bags to the inside of your pantry.
I hate rifling through my drawers and cabinets trying to grab a plastic bag when I need one. Here is a simple solution. Just tack the box with the plastic bags in it right to the inside of the pantry door. With the flaps the way they are, this is actually extremely easy, and it keeps the bags on hand when you need them.
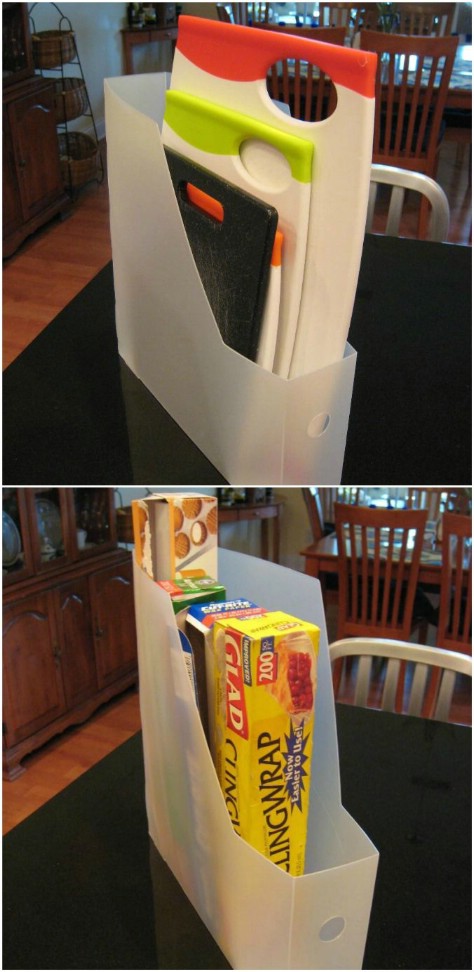
Bring out those magazine holders again!
My next thought after I found the solution for storing plastic bags was, “Can’t I just do that with my plastic wrap boxes too?” And then I remembered why that doesn’t work. Obviously you need the lid to help you cut the plastic wrap (or tin foil, etc.). Then I ran right into this genius storage solution. It’s time to bring out the magazine racks again! They are useful in the kitchen!
… And they are perfect for your cutting boards as well:
DIY Instructions and Project Source: Chicaandjo
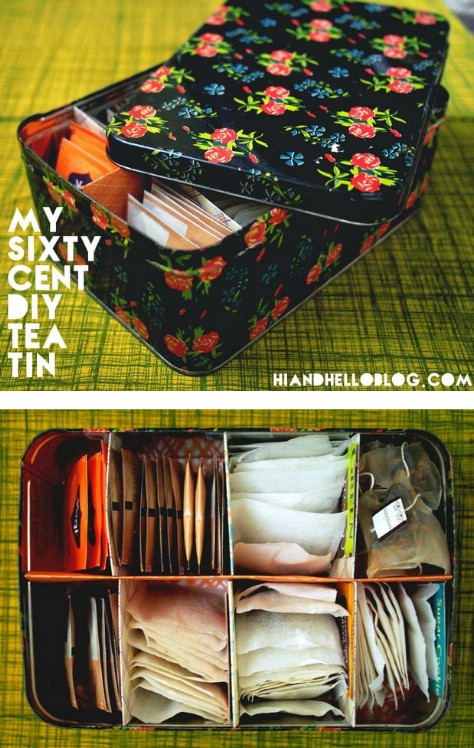
Make a tea tin with dividers.
Love your teas, but hate trying to find them when you have a dozen different types? One easy way to get them all organized and take up a lot less space is to make a tea tin with helpful dividers.
You can toss all those bags and boxes where you are storing all your tea bags separately, and just keep them all in one tidy place. If you think you need more space than this, just start with a bigger container. Add the dividers, and even label them if you like! It’s pretty, crafty, fun, and will free up room in your kitchen cabinet.
DIY Instructions and Project Source: Hi-and-hello
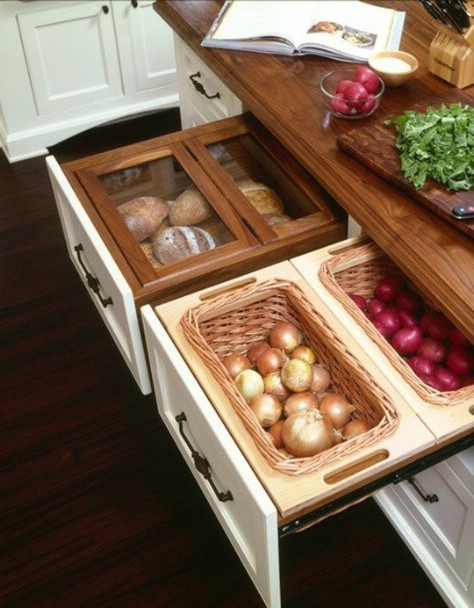
Keep your veggies in a drawer.
This one might seem obvious, but then again, if you are like me, you just leave all your vegetables rolling around on your countertop, and then wonder what happened to that onion or garlic you bought for your stew or soup.
You can corral your veggies in a drawer to keep them out of the way and organized. It prevents them from getting wet or rolling away. I love the way this person did it! The baskets are very cute!
DIY Instructions and Project Source: Apartmenttherapy
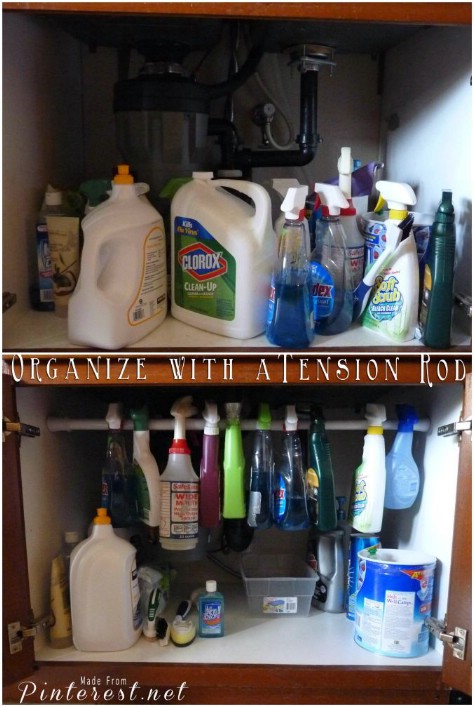
Install tension rods.
Tension rods are totally awesome. Check out this solution for storing spray bottles.
DIY Instructions and Project Source: Madefrompinterest
You get to free up all that space on the bottom of your cabinet, and the tension rod lets you line up your spray bottles neatly. You can find what you need instantly, and you no longer have to shuffle everything around just to get it out and use it. Putting it back is just as easy.
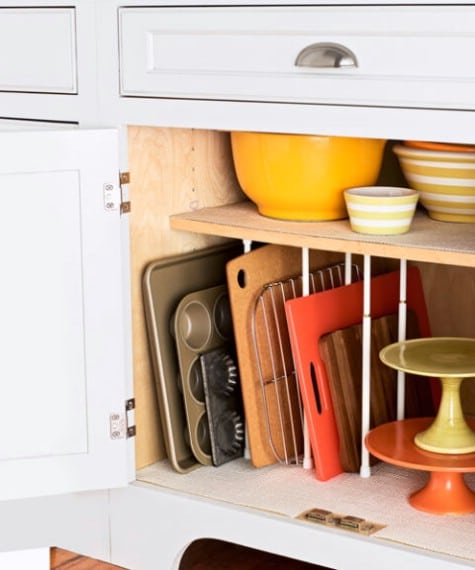
This isn’t the only great way to use tension rods either. You can also set up tension rods vertically to help keep plates, frying pans, and other items in line. If you experiment, you will probably come up with even more great ideas for using tension rods in the kitchen and all around the house.
DIY Instructions and Project Source: Goodhousekeeping
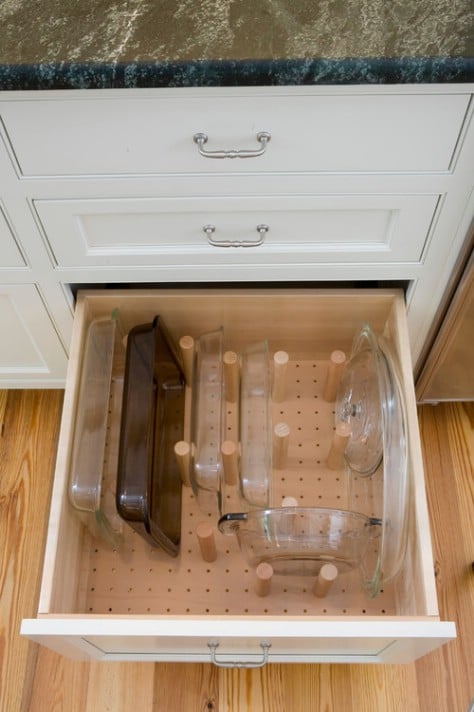
Use a pegboard organizer in your drawers.
This pegboard drawer organizer uses a similar principle. While you may not be able to find this accessory for sale, it does not look like a terribly difficult DIY project.
Photo/DIY Instructions and Project Source: Houzz
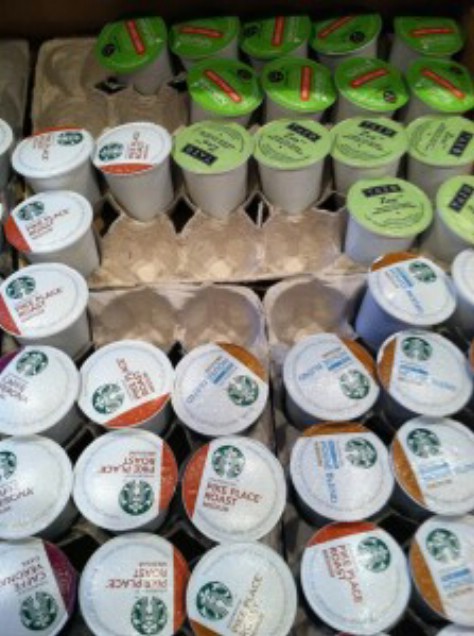
Store your K-Cups in an egg carton.
Home coffee machines are awesome, but those little K-Cup things can be such a hassle to store neatly, especially since you probably have a whole ton of them on hand at any time.
What do you know though—they actually fit perfectly inside of egg carton compartments! This is a wonderful way to save space while storing K-Cups and keep your K-Cups organized by flavor. You can see the labels on top so you find what you are looking for straight away.
Tip: Egg cartons are amazing! If you follow the source link below, you will find a lot of other clever uses for them! They are great for storing jewelry, craft supplies, nuts and bolts, office supplies, and so much more.
DIY Instructions and Project Source: Thejoyfulorganizer
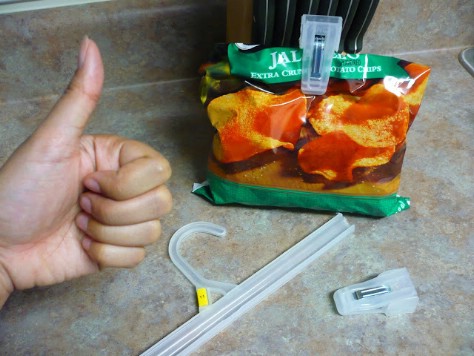
Make your own chip clips.
You know those hangers that are designed for pants and skirts in your closet? If you have some extra ones lying around, and you could use more chip clips for your kitchen, then try repurposing some of those hangers into chip clips. It is really easy. You just need the clip parts! Cut off the rest and you are good to go. Each hanger gives you two new chip clips.
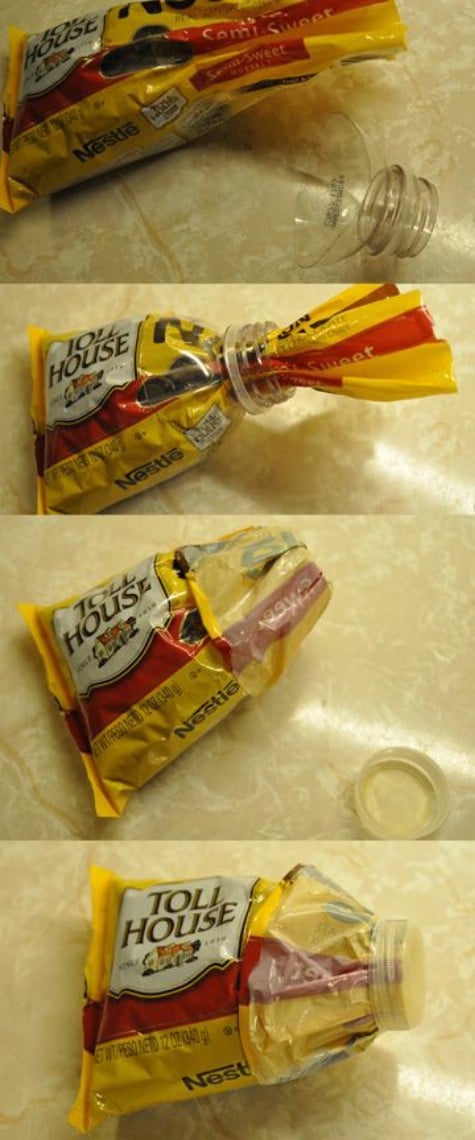
… Or repurpose an old plastic bottle
Here is another clever idea I never would have thought of. If you have an old plastic bottle, cut off the neck where it connects to the cap. You can pull a bag through it like so:
After you do the first step, you can fold the bag over and then add the cap. Yeah, you could just use one of those plastic twist-ties, but this idea is just so much more fun.
DIY Instructions and Project Source: Diyncrafts
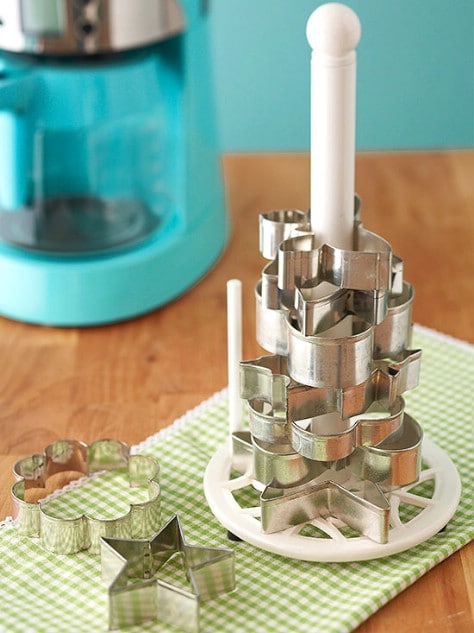
Organize cookie cutters with a paper towel rack.
Paper towel racks are useful for far more than just paper towel. If you want to keep your cookie cutters in place, just stack them over the top of it. This is another of those solutions where you will probably think of a ton of other applications once you start using it.
DIY Instructions and Project Source: Bhg
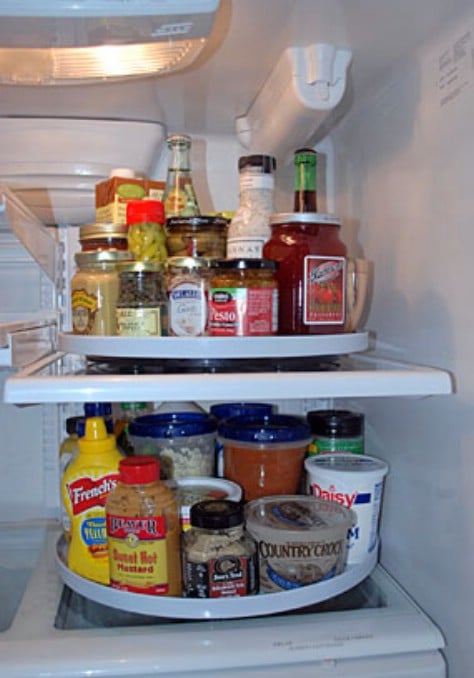
Get a rotating food tray.
A rotating tray for your fridge isn’t something you will conveniently have on hand, but it is definitely a cool thing to buy for your kitchen! If you hate reaching in the back of your fridge to grab bottles, knocking over half a dozen others in the process, then this item is for you.
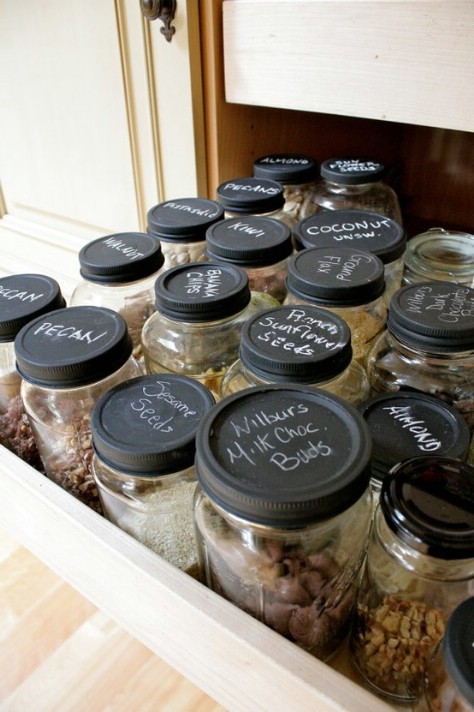
Label ingredients with chalkboard paint.
Chalkboard paint is absolutely amazing stuff to use all around the house, and is particularly perfect for kitchen organization. You can label the tops of ingredients jars and store them upright in a drawer. This is ideal for nuts, seeds, spices, herbs, and so on.
It makes it possible to see at a glance what is inside your containers, without having to have them be visible from the side.
Tip: Another great use for chalkboard paint in your kitchen is to organize your ideas, not just your stuff! You can paint a free wall or the side of a cabinet with chalkboard paint, and then write your recipes and grocery lists up there.
Available on : Etsy Chalkboard Glass Jars Winter Garden Party
Organize Your Clothing
Certain types of clothing just create chaos in the closet. I’m talking about socks, underwear, scarves, hats, and other small items that love to get mixed together. Here are some amazing ideas for keeping them sorted.
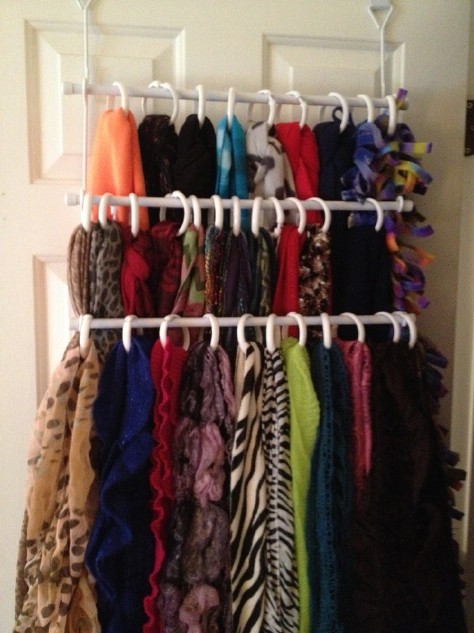
Organize your scarves with shower curtain rings.
Towel bars and shower curtain rings turn out to have many more applications than you might guess! Keeping scarves organized is such a hassle! They love to bunch up everywhere, and it’s hard not to just strew them wherever.
Hangars really don’t work all that well to keep them in place. Plus, hangars are a bulky solution for a problem that requires something more elegant. This system with the towel bars and shower curtain rings is genius!
DIY Instructions and Project Source: Pinterest
Make your own tie holder.
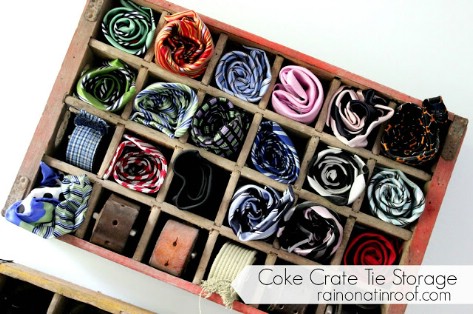
Here is an old coke crate repurposed as a tie holder. It does a wonderful job keeping the ties organized, and on top of that, it looks really cute, especially if you are into the rustic look.
This would also work really well to store socks, underwear, stockings, or anything else small. You can see that there are a few belts in here as well.
DIY Instructions and Project Source: Rainonatinroof
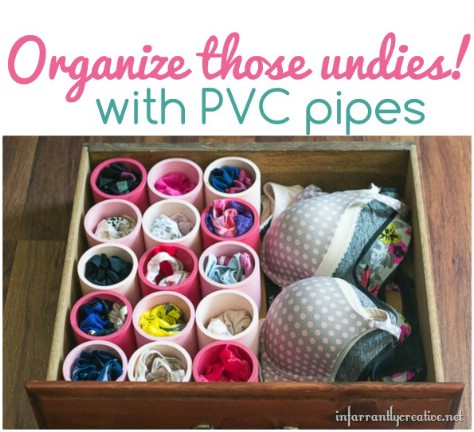
Organize underwear in PVC pipes.
Remember the PVC pipe earlier for storing your hairdryer? As it turns out, PVC pipes are also quite useful in your closet. If you are looking for a fun way to store underwear, you’ve found it.
These pies have all been painted different colors for a nice effect, and have been stacked next to each other so that a couple pairs of underwear can be stored inside of each.
There is a full tutorial to teach you how to do it yourself. What I like about this idea (aside from it being adorable) is that it looks like it would take up too much space in your drawer, but it actually frees up space. You can see where everything is instantly, and you can grab what you need without disturbing the rest of the drawer.
DIY Instructions and Project Source: Infarrantlycreative
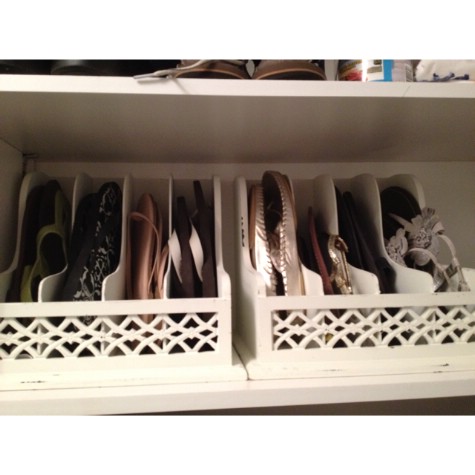
Use a letter organizer for your flip flops and sandals.
If you have flip flops and sandals strewn all over the floor of your closet, here is a super simple solution: just store them inside a letter organizer.
This is similar to the idea from earlier where you stored hair supplies in a magazine organizer. In fact, that would be a nice alternative, but this works best because it makes your shoes easy to grab. You can also store a lot of them this way with no problem. Very cool!
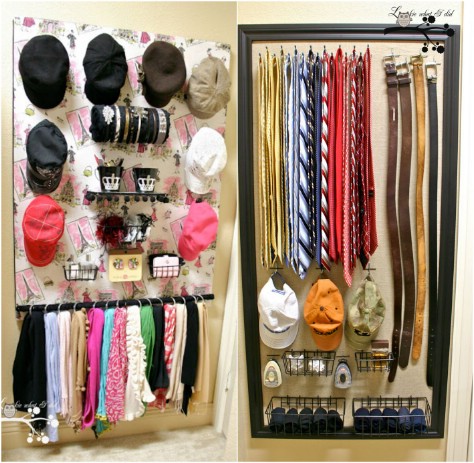
Time to bring out the corkboard again!
Earlier I showed you how you could cover corkboard in fabric and use it to store your necklaces and other loose, dangly jewelry.
Corkboard is handy in the closet as well, where you can use it to store belts, ties, hats, and more. You can even affix little wire shelves onto the corkboard, as you see here. The wire shelves are very lightweight, and you can use them to hold all kinds of little odds and ends.
DIY Instructions and Project Source: Lookiewhatidid
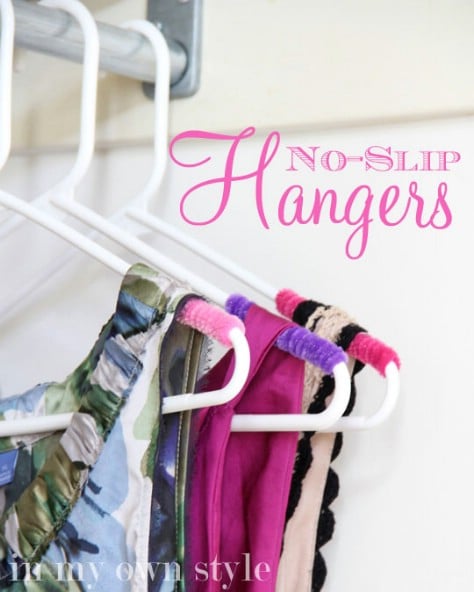
Stop your clothes from falling off your hangars.
I don’t know about you, but it totally drives me crazy when my clothes fall off my hangars. I will never understand why hangars are designed the way they are!
Whether you get the plastic ones or the wire ones, your clothes just slip right off. And if your closet is as packed as mine, things can get lost in there for a long time before surfacing again to see the light of day.
Who knew that was so easy to prevent? No, you don’t have to go out and buy special hangars, and this solution looks like it might potentially work even better than those ones designed for the purpose. All you have to do is attach pipe cleaners at the ends of the hangars!
They provide the friction you need to keep your clothing in place, but they don’t provide so much that it’s hard to put your clothes on the hangars in the first place. Amazingly simple solution!
DIY Instructions and Project Source: Inmyownstyle
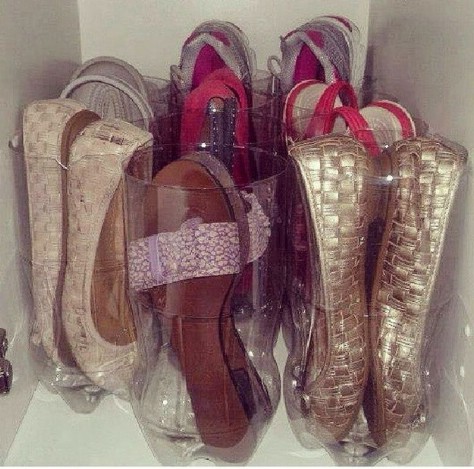
Store your shoes the easy way.
This may be one of the smartest closet storage hacks I have ever seen. Just cut the tops off of old plastic soda bottles and use them to store your shoes. The shape of the bottle perfectly fits the tips of your shoes. So cool!
Organize Your Cords
Yes, organizing your cords gets an entire section, because cords are that much of a pain! Technology is awesome, but nothing is more unsightly than a dozen cords going a dozen directions—plus they can be a hazard while they’re plugged in.
And what about cords you have in storage or cords you’re moving? It’s so easy to mix them up. These clever organizing hacks will help you to keep them straight.
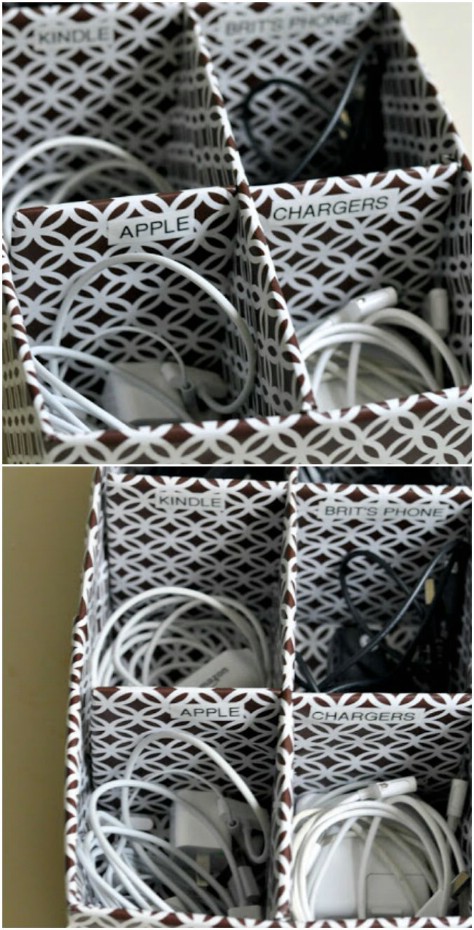
Create a DIY cable box.
If you are looking for a way to store cables while you are not using them and remember which cable does what, then this DIY cable box is a great tutorial! This container not only does the job neatly, but it’s actually pretty to look at.
DIY Instructions and Project Source: Darkroomanddearly
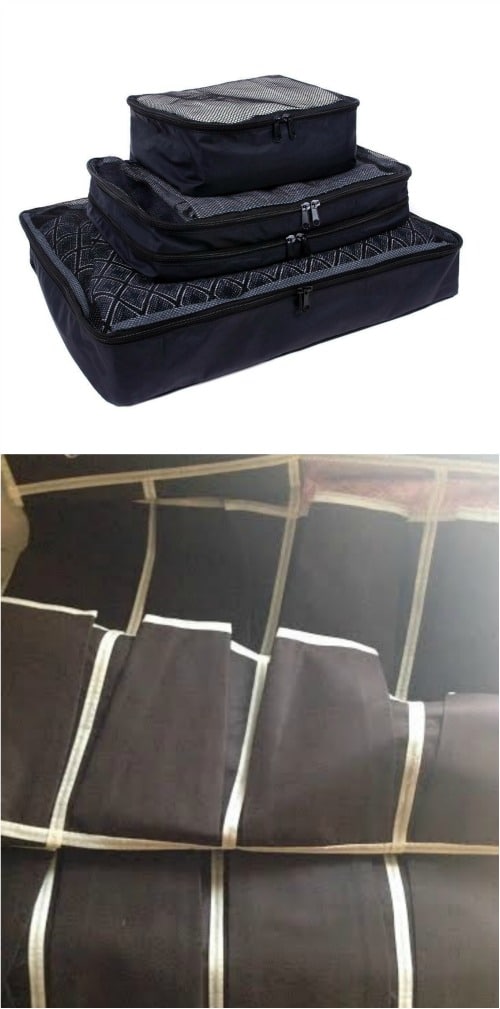
Ohuhu Travel Organizers
This travel organizer is wonderful. The set comes with two pieces, one of which holds clothing like a shirt and pants. This piece though, holds shoes, cosmetics, scarves, whatever!
You can put socks in the individual pockets or use them to keep smaller items like toiletries sectioned off and easier to find when you’re traveling. When I’m not traveling, I plan to use this to organize things in my closet. It will be perfect for holding belts and scarves, and can be hung easily to keep things in reach.
Available on Amazon.com
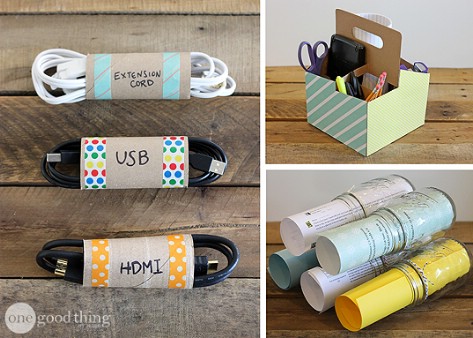
Put your cords inside toilet paper tubes.
This works well as a general storage solution for un-used cords, and is also great if you are transporting cords for a move. It’s almost effortless! You just stuff the rolled up cords inside toilet paper tubes and label them. These ones have been decorated with washi tape so that they are nicer to look at.
DIY Instructions and Project Source: Onegoodthingbyjillee
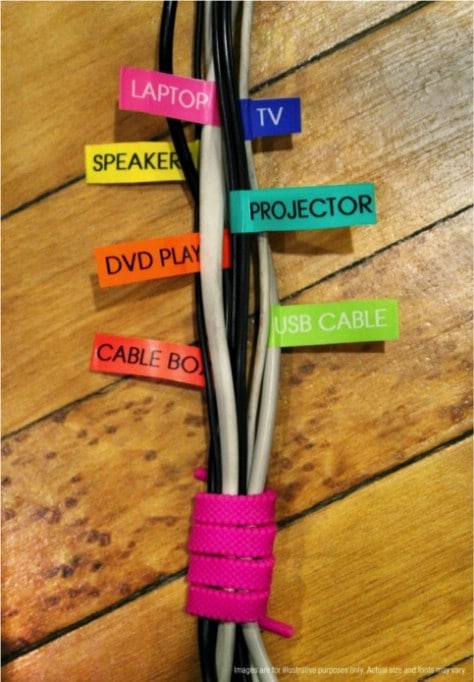
Label your cords.
Look at how beautifully labeled these cords are! I love the bright colors, because they instantly grab your eye, and they also make it easier somehow to see which cord is why. If they were all on white labels, I think my eyes would just glaze over. A rainbow of organization!
DIY Instructions and Project Source: Yesmissy
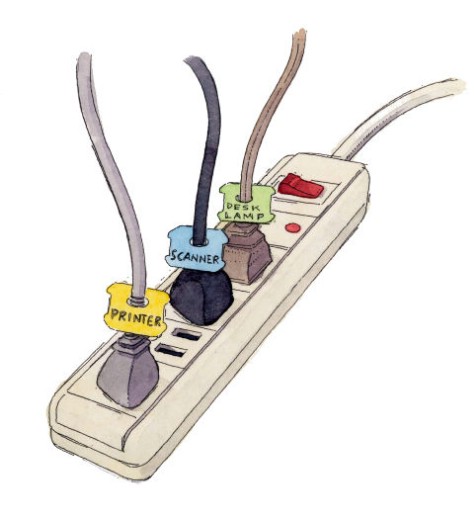
Use plastic bread tags.
This is one of the simplest ideas I have ever seen to instantly label your cords right by the power strip! Start saving old plastic bread tags, and then label them with then names of the devices. You will never unplug the wrong thing again. That is just brilliant. Now why didn’t I think of that …?
DIY Instructions and Project Source: Redbookmag
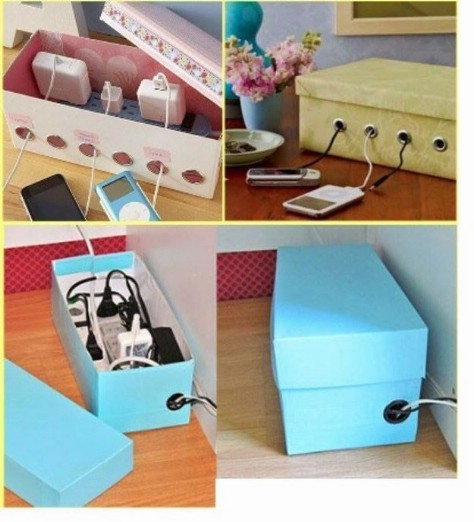
Neatly conceal your power cord in a shoebox.
Hate the messy look of power cords and plugs? Conceal it from sight using an old shoe box. You just need to punch holes through so you can plug your devices in.
If you need to plug or unplug anything on the strip, you have to open the box, but you can conceal it again just by putting the lid back on. Decorate the box and it will look really pretty. This is really wonderful!
DIY Instructions and Project Source: Buzzfeed
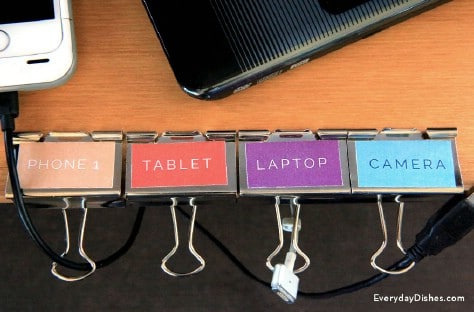
Run your cords through binder clips.
I really like this idea because it serves multiple functions. First, it helps you remember which cord is which. Secondly, it helps you keep your cords organized as you run them up to your desk.
Every cord has a place, and you will always run them up through the most efficient pathways to your devices. I also like that if you were to rearrange, you could easily just unclip one clip, slide another out of the way, and then replace it, without even extracting your cord.
DIY Instructions and Project Source: Everydaydishes
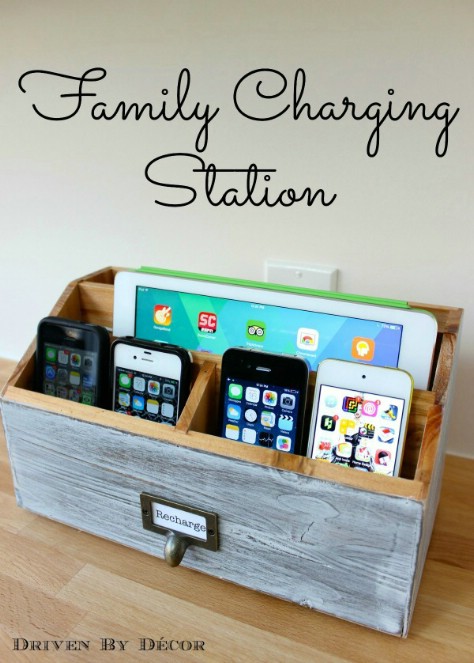
Create a family charging station.
This family charging station by Driven by Décor is just beautiful! I love the homespun look, and the compartments are perfect for different sizes and types of devices. The cords run out through the back and into the wall.
If you visit the page, the instructions are reasonably thorough, though not a full tutorial. It would be pretty easy to figure out how to create a similar station in your own home. I love the convenience of this, and the style!
DIY Instructions and Project Source: Drivenbydecor
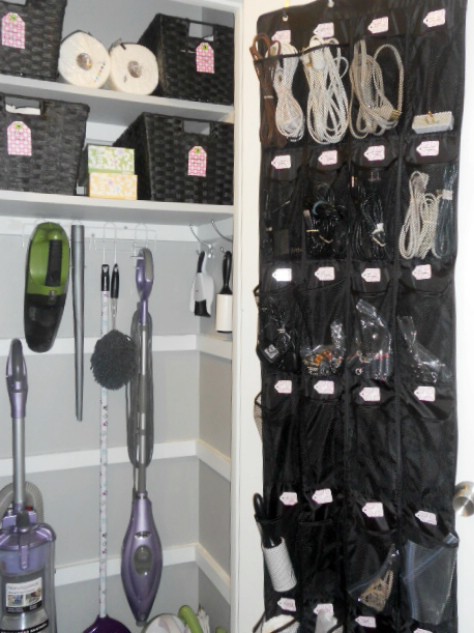
Shoe organizer to the rescue (again)!
Look, another amazing use for a shoe organizer! If you have a lot of cords you are not actively using, this would be a perfect way to store them!
DIY Instructions and Project Source: Iheartorganizing
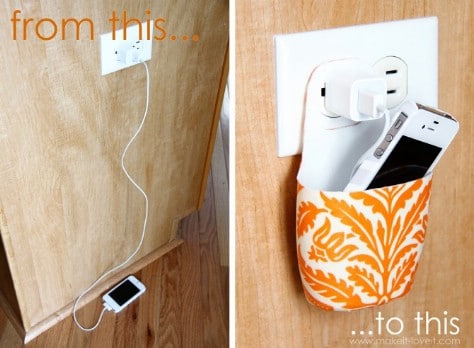
Turn a used lotion bottle into a beautiful holder for charging a cell phone.
Here is one I am seriously blown away by. Looking at the finished result, you would think that holder is a specialized item purchased at the store, wouldn’t you? But it’s not! This accessory was created from scratch using an old lotion container.
Fabric has been affixed around the outside to give it a nice finished look. It is thin and lightweight and easily can hook around your plug without stressing the connection. Your phone sits inside while it charges. Really great work, and looks easy to do!
DIY Instructions and Project Source: Makeit-loveit
Organize Your Hair, Jewelry, and Beauty Supplies
Hair stuff, jewelry, and beauty supplies are some of the hardest items to keep organized. All those little hair ties and hair clips, headbands, eyeshadow containers, lipstick tubes, makeup brushes, necklaces and earrings … what a mess!
These smart ideas will help you get it all in order. And a lot of them use standard household supplies you wouldn’t even think would come in handy!
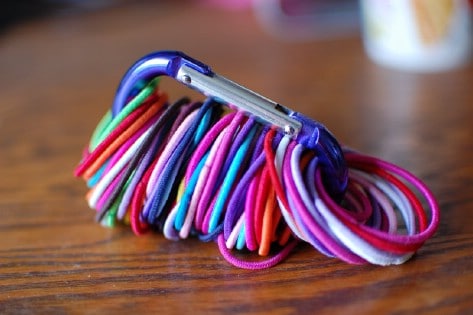
Use a carabiner to get your hair ties organized.
Have a thousand of those little hair ties everywhere? When you buy these things, they typically come in backs with 20 or 30. They’re small and can easily get mixed up with everything else you own, sink to the bottom of drawers, or drop behind furniture, never to be seen again. But all you need to get them organized is a carabiner.
Just use it like a spool to contain them all, and then close the carabiner. Those hair ties aren’t going anywhere!
DIY Instructions and Project Source: Themiddleflipper
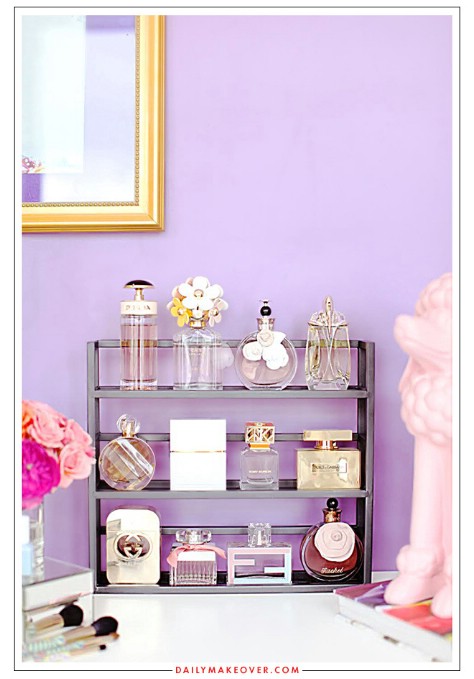
Use a spice rack to display your perfume bottles.
Who wants their perfume bottles to be all in a jumble? A spice rack is a simple, clever, and surprisingly elegant solution. This display looks fantastic, and keeps everything within easy reach.
DIY Instructions and Project Source: Cosmopolitan , Dailymakeover
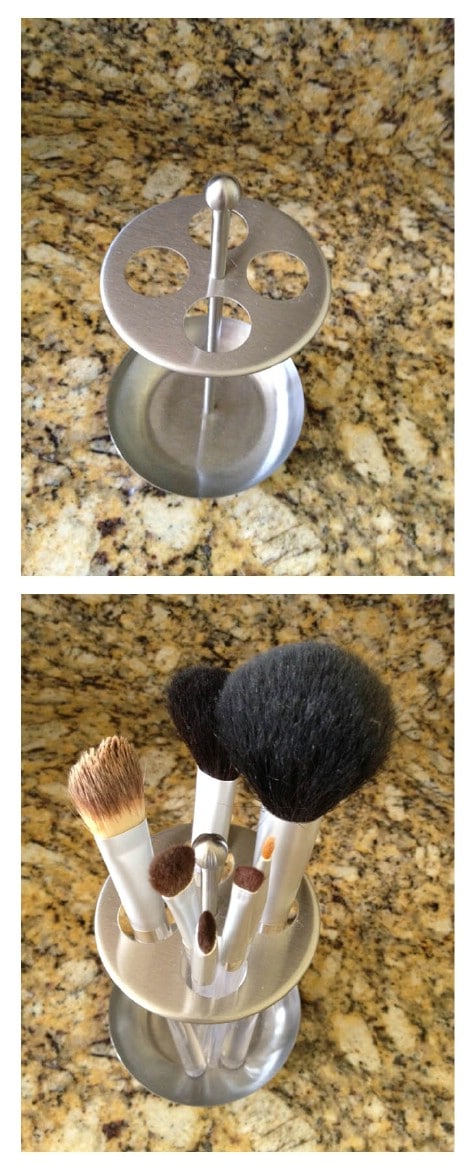
Store makeup brushes in a toothbrush holder.
Tired of all your makeup brushes sliding around in the cup you are probably using to store them right now? This solution will keep them upright and will stop them from falling into each other and getting the bristles all messed up. Just use a toothbrush holder! Very smart!
DIY Instructions and Project Source: Saecca
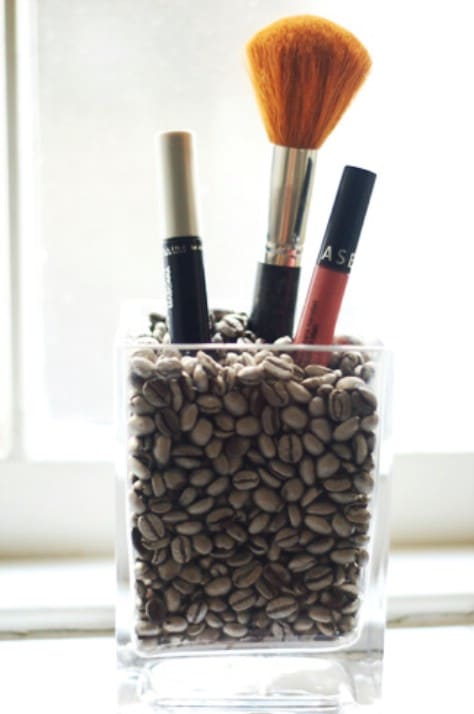
Fill a vase with coffee beans for your brushes.
Here is yet another clever way to store your makeup brushes. Using a vase or a cup or mug or any other container, you can keep your brushes upright just by adding coffee beans first. If you don’t want to use coffee beans, you could also use dried beans or beads. Glass globs would work great too! Just think how pretty that would be!
Tip: If you happen to be an artist, this is also a great way to store your paintbrushes in your craft studio.
DIY Instructions and Project Source: Pinkbasil
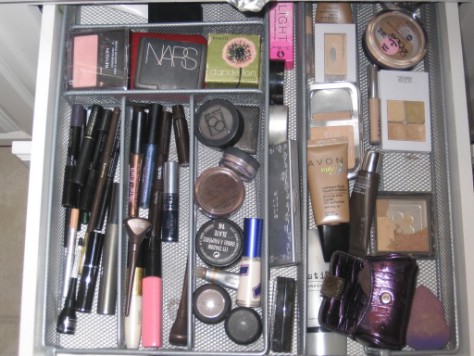
Use a kitchen utensil tray.
Instead of just purchasing a generic plastic bin with dividers, a kitchen bin designed to hold utensils in your drawer is perfect for storing makeup brushes, eyeliner pencils, and other long, thin items. These items won’t necessarily fit in every plastic bin with dividers you come across. Great solution!
DIY Instructions and Project Source: Jennysuemakeup
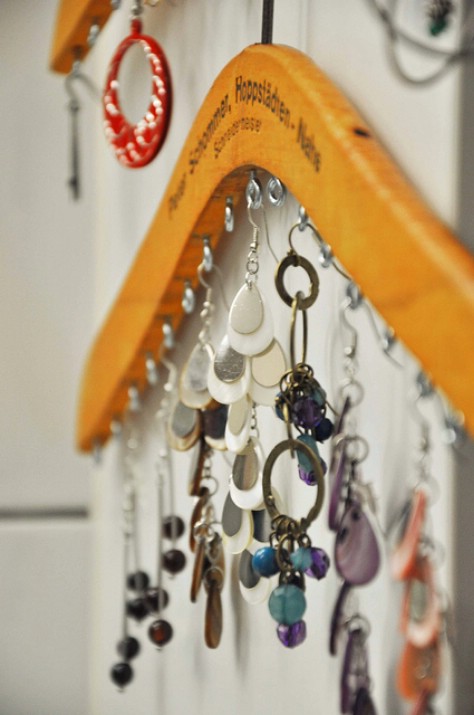
Use an old wooden hangar to store your necklaces.
Storing long, dangly jewelry like necklaces, bracelets, and earrings is always a challenge because these items love to tangle and knot! When you store them with care, you protect them from getting damaged.
This is just an insanely clever idea! Grab a wooden hangar and insert eye screws. Hook your jewelry onto the eye screws. You can get a lot of items stored on just a single hangar, and they will not tangle together. Hang it up on your wall and your jewelry will be easily accessible. This is way more space efficient than a jewelry tree!
DIY Instructions and Project Source: Diyhshp
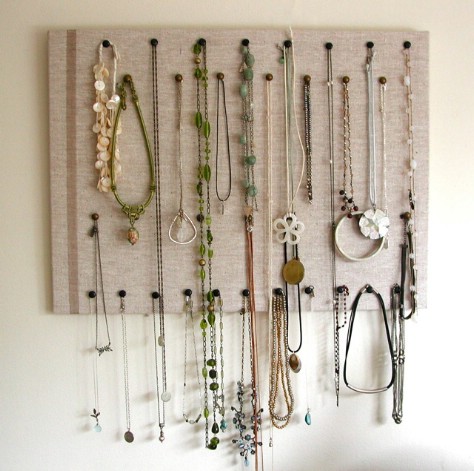
Or … try a corkboard!
If putting the eye screws in the hangar sounds like too much work, here’s a super fast and easy solution. Just use a corkboard! Putting tacks in a corkboard is effortless, and you can hang jewelry quickly this way. What I particularly love about this particular display is the fact that its creator covered it in fabric.
Not only does that provide a beautiful texture, look, and feel, but it also hides all the unsightly little holes in the corkboard.
DIY Instructions and Project Source: Hellobeautyblog
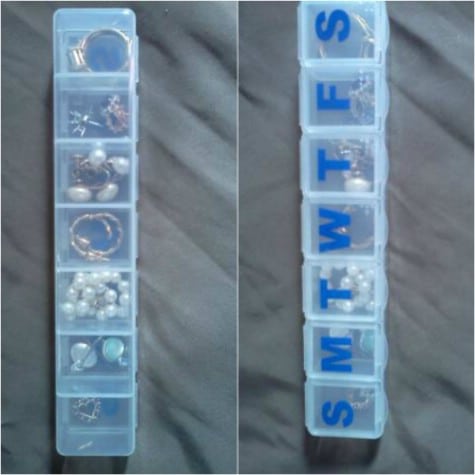
Jewelry travel solution: pill box!
Traveling with jewelry can be such a pain! If you don’t want your jewelry to tangle or get lost, you’re going to need a great container. But why pay a ton of money for a jewelry travel case when you don’t have to? Have an old pill box in your medicine cabinet you are not currently making use of?
Repurpose it into a convenient carrying case for your jewelry. It is perfect for necklaces, earrings, pendants, and more. Oh yeah, and you can also use this as a permanent at-home solution. It’s great for storing small jewelry items even when you are not on the road.
Tip: This is another storage idea which is ideally suited to your craft room if you’re a jeweler and need a solution for storing seed beads and other odds and ends!
DIY Instructions and Project Source: Howtohaveitall
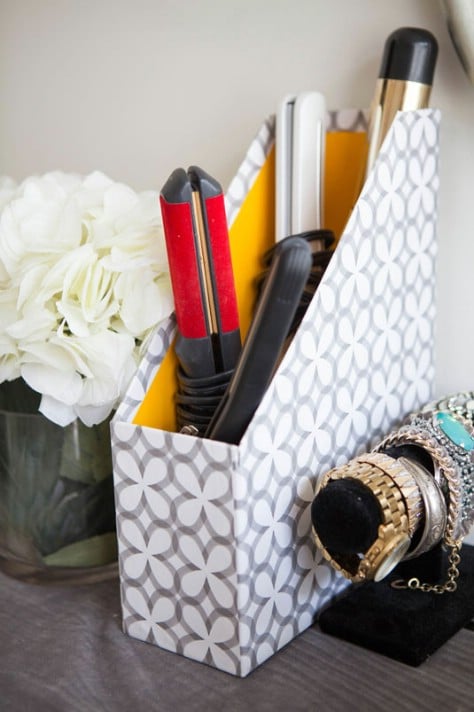
Use a magazine holder in an unconventional way.
What a smart way to store your flat irons, curling irons, and other hair care supplies. I imagine there are a ton of other purposes this solution would be ideally suited for, and not just for your beauty supplies.
DIY Instructions and Project Source: Cosmopolitan
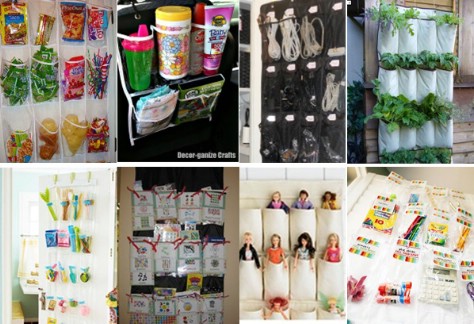
Use hanging shoe organizers for just about everything.
Those hanging shoe organizers that you can tack to the inside of a closet door are absolutely phenomenal! You can use them to store a hundred different things, and they are particularly handy for hairstyling and makeup supplies. Here are a couple of different ideas for how you could use them!
This one may actually be another type of organizer (looks a little small for shoes; this was probably a jewelry organizer), but the principle is the same:
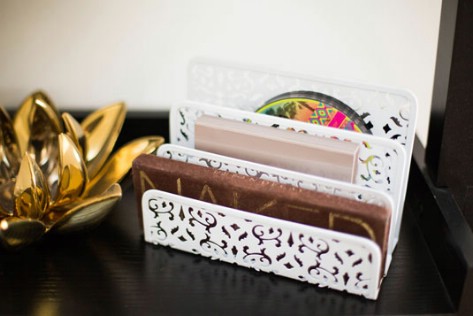
Store your makeup palettes with a desk file organizer.
Have any larger makeup palettes? One of the best ways to keep them out of the way is to store them vertically in a desk file organizer!
DIY Instructions and Project Source: Cosmopolitan
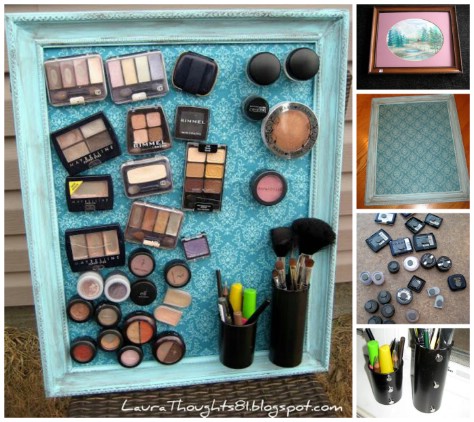
Magnetize it.
Want to be able to grab what you need right away when you are doing your makeup routine? Put a metal board on your wall, and then stick magnets on the backs of your makeup containers (effortless with metal containers). Then stick the containers on the wall. You can grab them effortlessly, and they stay organized and out of the way!
DIY Instructions and Project Source: Laurathoughts8
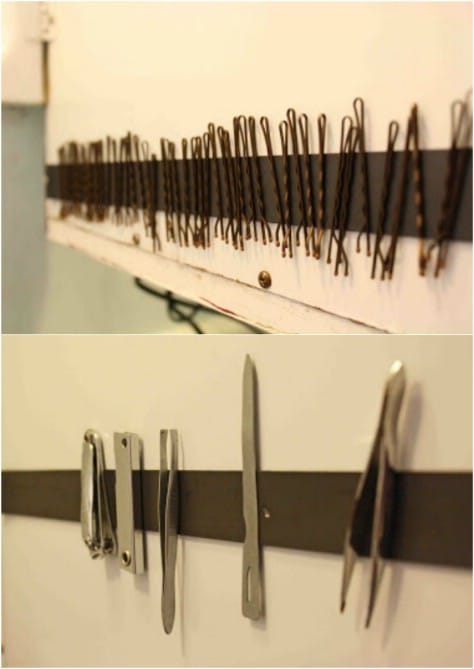
Use magnetic tape to hold bobby pins and other small metallic items.
Bobby pins are handy for your hair, but they get lost so easily! This is a really easy solution if you want to keep them sorted and prevent them from getting misplaced.
Just attach a strip of magnetic tape to a medicine cabinet or another handy surface, and add the bobby pins. You will always know where they are, and you will be able to reach out and grab one effortlessly, even if you’re holding up your up-do with your other hand. As you can see, it is also useful for tweezers and more:
DIY Instructions and Project Source: Sprwmn
This would also be an amazing helpful way to store safety pins.
Use a paperclip holder instead.
I don’t find this solution quite as elegant, but it’s still quite handy. And it takes up less space and it’s less visible if you don’t like the look of the magnetic strip.
DIY Instructions and Project Source: Explosion
Store your hairdryer in a PVC pipe.
This has to be one of the cleverest things I’ve seen yet! Use a PVC pipe to store your hairdryer. The smaller pipe can easily store another supply like your heat press or even a bottle of hair spray. Very cool. You could also paint this pipe and decorate it so that it looks pretty.
Available on: Etsy PVC Pipe Hair Tool Holder
Use the inside of your cabinet doors.
If you do your hair care routine in your bathroom, make sure to utilize the inside of your cabinet doors. Attaching these little hooks allows you to hang your curling irons and other supplies so they stay out of your way and the cords stay untangled.
Turn an oatmeal bin (or anything similar) into a headband organizer.
It is hard to believe looking at it, but this little headband organizer actually started its life as an oatmeal container!
This tutorial will teach you how to convert it into a headband organizer by painting it and embellishing it with a cute little stand. It turns out it is the perfect size for storing headbands. What is great about this idea is that you could easily modify it and customize it to your heart’s content with different decorative accents.
DIY Instructions and Project Source: Makeitmyown
Organize Your Office Supplies
The home office is another part of the house where you have a lot of small odds and ends you need to keep organized.
Chances are you don’t have your own inventory room like you would at your corporate workplace, which means that all that stuff can quickly make a real pigsty of your office if you let it get out of hand! Here are some cute and clever organizing ideas!
Use an old muffin tin.
A vintage muffin tin can make a great storage container. All those little compartments are just the right size to store everything you need, and you can easily pick the entire thing up and move it if you need to. Great idea, as long as you have somewhere to put it!
DIY Instructions and Project Source: Tatteredstyle
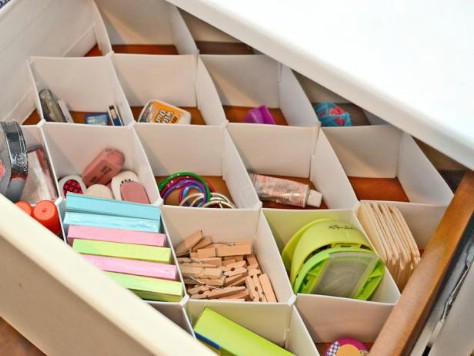
Try using drawer dividers.
Check out these handy drawer dividers! This is an easy, temporary solution if you want to make cubbies inside a drawer for small office supplies. Then if you decide to repurpose the drawer for something else later, you can remove the dividers and place them in another drawer. This is a nice flexible solution that is a lot more elegant than plastic bins.
DIY Instructions and Project Source: Hgtv
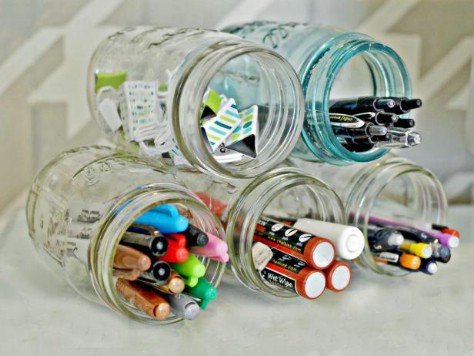
Stack Mason jars.
We are seeing Mason jars everywhere right now. They’ve become a favorite organizing and decorating supply for vintage-lovers who want to add an old-fashioned touch to their homes. Now you can add a vintage touch to your home office! Stack these jars and they make perfect containers for pens, markers, and other small supplies.
DIY Instructions and Project Source: Hgtv
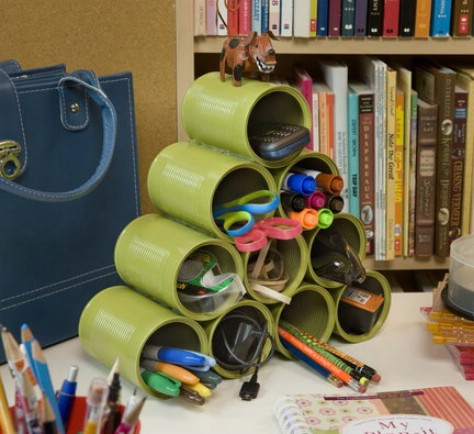
Make an empty tin can organizer.
Here is a simple variation on the stackable Mason jars. Instead of stacking Mason jars, consider stacking tin cans! These tin cans have all been spray painted green and glued together so they won’t topple over.
And don’t they look just adorable? You can customize this project easily since you can paint your tin cans any way you want, and you can add as many or as few compartments as you’d like.
You also don’t have to stick with the pyramid shape either since you’ll be gluing the cans together, though it would still be the most stable design. This organizer is perfect for storing an array of office supplies!
DIY Instructions and Project Source: Oregonlive
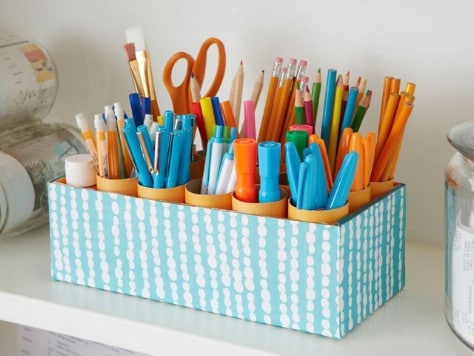
Use a shoe box and toilet paper rolls.
This is the same basic idea as the two above, only you create the arrangement with the tubes facing upright, instead of sideways, and replace the tin cans or Mason jars with toilet paper tubes in a shoebox! I actually am stunned by how great this one looks.
If you use a shoe box with a cute pattern on it, you actually get a very nice chic look. You can store a lot of supplies upright this way in a contained space. This arrangement also is easier to pick up and move than the two ideas above.
DIY Instructions and Project Source: Dailysavings
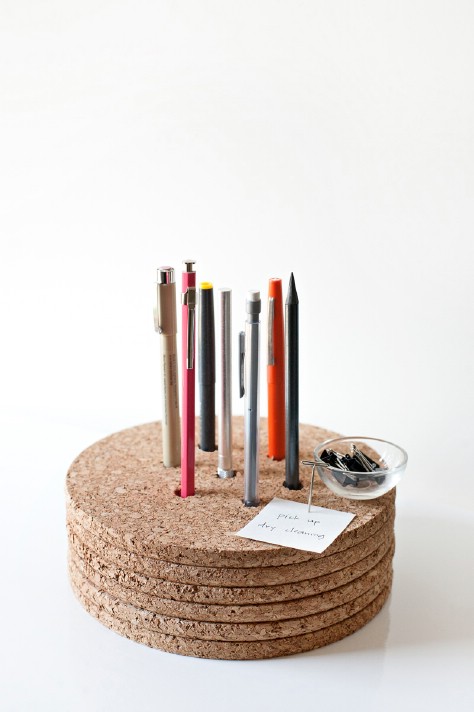
Store pens upright in cork trivets.
Speaking of upright storage, here is a very cute solution using a stack of cork trivets with holes drilled through them. The step-by-step tutorial in Design for Mankind will teach you how to make this yourself.
I like that you can add as many or as few holes as you want in whatever sizes you need. This would make a fun conversation piece at your day job too. Make two—one for your home office and another for your day job office!
DIY Instructions and Project Source: Designformankind
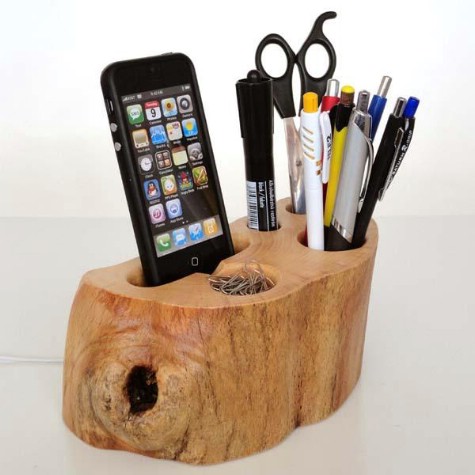
Create an organizer out of a tree stump.
This is a handmade desk organizer sold on Etsy. The eco-friendly design features a space for your pens, pencils and markers, highlighter, scissors, paper clips, iPhone, and more.
This is like an upscale version of the cork organizer. It would be a more challenging project to do yourself, but if you are into woodworking, it would be a very fun and artistic one.
Available on: Etsy: Tree Stump Organizer, iPhone dock + Office Organizer
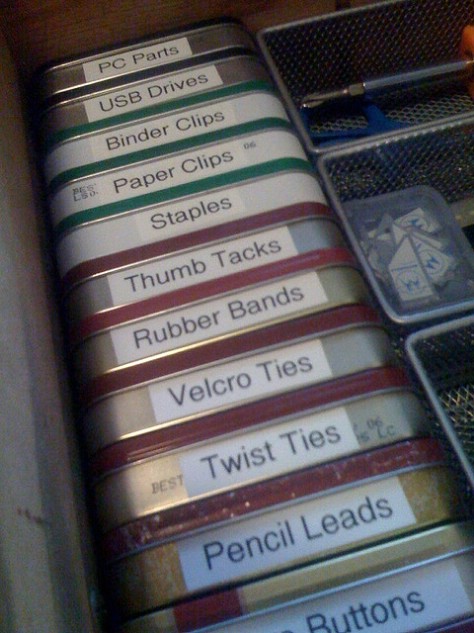
Organize your supplies into Altoids tins.
If you happen to be hooked on Altoids, start saving the tins (if you don’t have a stash already!). As it turns out, these particular tins stack perfectly, and thanks to their design, they will not slide around or topple over.
You can stack them in a drawer or even stack them vertically on a shelf if you want. You can easily fit a label on the side of each. This is a perfect way not only to consolidate office supplies, but also to put leftover tins to good use that might otherwise just take up space.
Image/DIY Instructions and Project Source: flickr.com
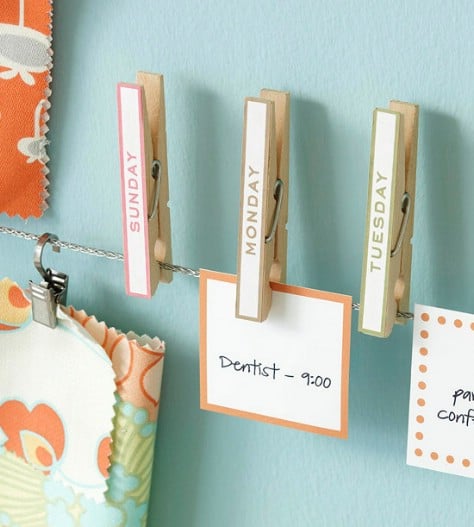
Organize your schedule on a clothesline.
In our home offices, we not only have to keep our supplies organized, but also our time! This is a very clever idea for a weekly calendar. Simply label clothespins with the days of the week and hang them on a clothesline. You can then easily add and remove scheduling notes from each of the clothespins. It’s cute and it’s smart!
DIY Instructions and Project Source: Bhg
Use pails for incoming and outgoing mail, tasks, etc.
There are a lot of reasons you could need an inbox and an outbox. You might use this solution for your mail, bills, or even for communicating with other members of your household. These pails would go great in your home office or your mail station or family command center.
DIY Instructions and Project Source: Bhg
Keep the Family Organized with This Great DIY Command Station
Crazy Little Projects has this nifty command station that will help you to keep things organized. On the station is a bulletin board, chalk board, key hooks and a magnet board so you can keep messages between you and the family in one place and you will always know where your keys are.
The entire project was only about $15 and really easy to make. You could use one of these as a great gift or just make on for yourself – or both. We love that it helps busy moms to stay more organized. Just remember to stock up on sticky notes and chalk!
DIY Instructions and Project Source: crazylittleprojects
Organize Your Craft Room
What’s more cluttered than the home office? Typically it’s the craft room! If you don’t even have a craft room, then your craft clutter is likely impinging on another room in your house. Craft clutter not only makes a mess of things, but also makes it harder to actually find what you need, focus on your work, and complete your projects. A neatly organized craft room helps to clear your mind and keeps you engaged and inspired. Here are some clever ways to organize your small crafting supplies!
Redo Your Craft Closet with This Easy DIY Project
Organization is key to any good crafting project and if your closet looks like a tornado has gone through it, it may be time to consider a redo. This great craft closet transformation comes from Shanty 2 Chic and is a must for any avid crafter.
Everything is so organized and there is a spot to keep all of your crafting supplies put neatly away. With a closet that looks this good, you may never want to leave your little crafting corner. You just have to put up a few shelves and find some of those handy baskets. A pegboard works wonders for keeping hangables organized, too.
DIY Instructions and Project Source: Redo Your Craft Closet with This Easy DIY Project
Use a spice rack holder for craft supplies.
On this blog, you can view a tutorial for how to convert a spice rack holder into an art supply holder. Originally the spice rack holder was unfinished wood, but it’s been painted.
You can use the same spice jars that came with your rack. I actually like the unfinished look of the wood, but again, this is something you can customize based on what you like. This is perfect for buttons, beads, and so much more.
DIY Instructions and Project Source: Rockwellali
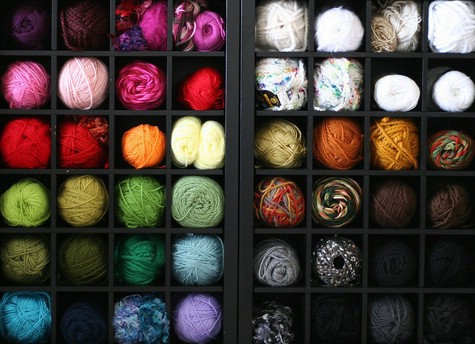
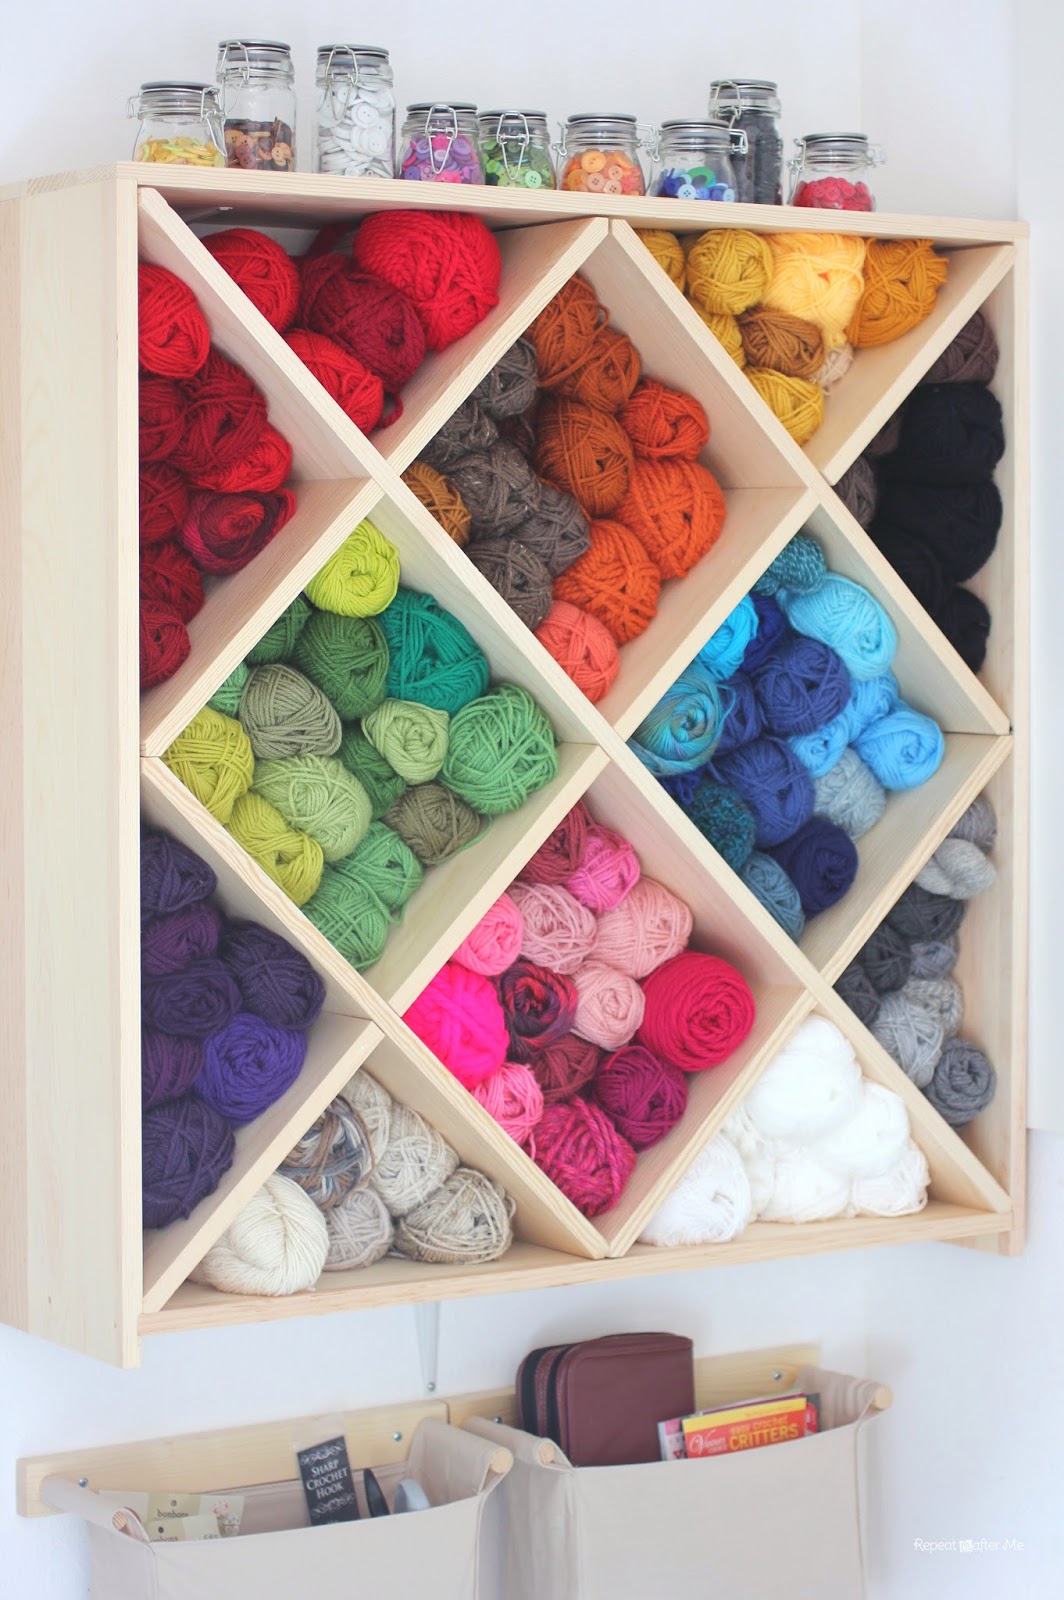
Use a wine rack to store your yarn.
Looking for an easy solution to storing your yarn in separate, neat, organized cubbies? A wine rack turns out to provide you with the perfect size spaces.
DIY Instructions and Project Source: Prettyprudent
Above you see a wine rack which has a separate compartment for each bottle—or each yarn spool.
Below you can see another example of a wine rack used for yarn storage. You have larger cubbies here. The yarn spools are organized by color, which makes it easy to grab what you are looking for, and it looks really awesome!
DIY Instructions and Project Source: Repeatcrafterme
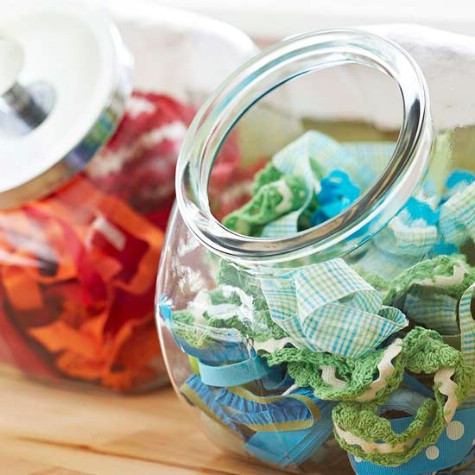
Store craft supplies in vintage candy jars.
You know those candy jars you sometimes find in shops where you can reach in at an angle and grab the candy you want to buy? Those jars are perfect for crafting supplies for the exact same reason. They are ergonomically at a much better angle for reaching in and out a lot than if they opened on the side or on the top. You can use them for just about anything since they are large enough even for scraps of cloth and sewing supplies.
DIY Instructions and Project Source: bhg
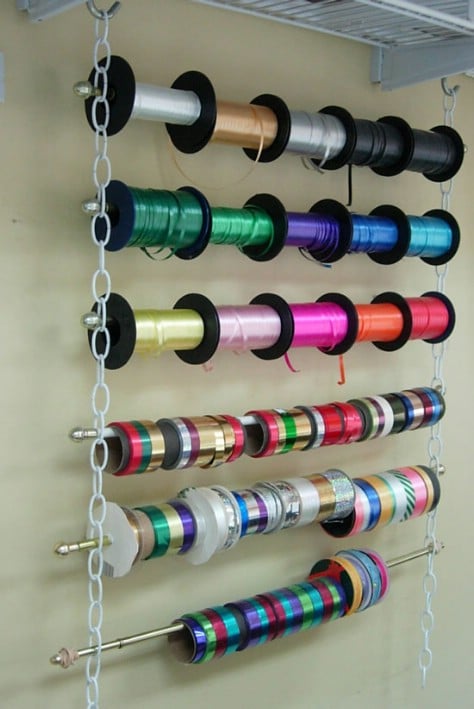
Make a ribbon holder use curtain rods and lengths of chain.
This is a simple DIY project with step-by-step instructions from In My Own Style. Following this tutorial, you can create a really awesome storage solution for ribbon, and hang it up in your sewing room.
I like that this project doesn’t require any sawing, drilling, or painting, which makes it approachable even if you aren’t into hardware projects. Anyone can create this just by following the easy tutorial. I imagine it would also be useful for storing other sewing supplies.
DIY Instructions and Project Source: Inmyownstyle
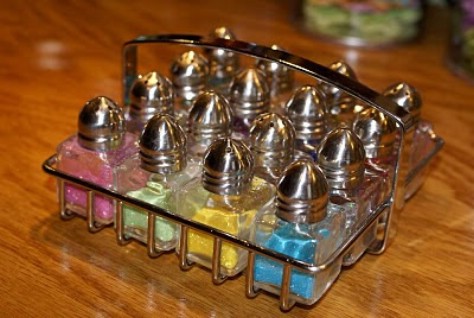
Store glitter in salt shakers.
Glitter makes everything sparkle, but it does like to make everything sparkle, because it gets on everything! If you want to keep your glitter contained and also easy to use, salt shakers are the perfect solution.
If you can find a set like this one which includes the salt shaker holder with the handle, that is awesome. Then you can easily carry it anywhere you need it, all without making a mess.
DIY Instructions and Project Source: Organizethings
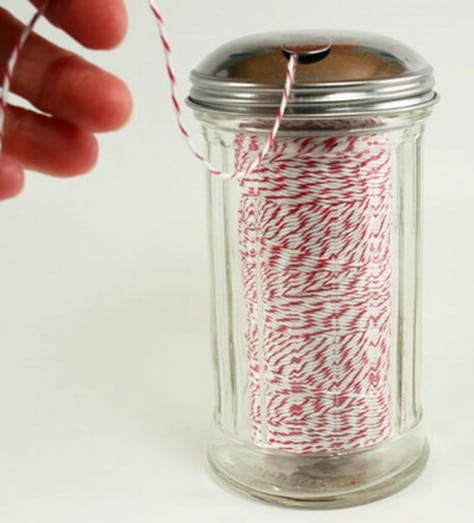
Put twine in a sugar dispenser.
Speaking of culinary items which are useful in the craft room, salt and pepper shakers aren’t all you should look into using. A sugar dispenser is also incredibly useful.
Want to keep your twine from unraveling? Just store the spool inside the dispenser and direct the end of the twine up through the opening. You can pull it out as you need it and it will unwind without coming undone.
DIY Instructions and Project Source: Whiskergraphics
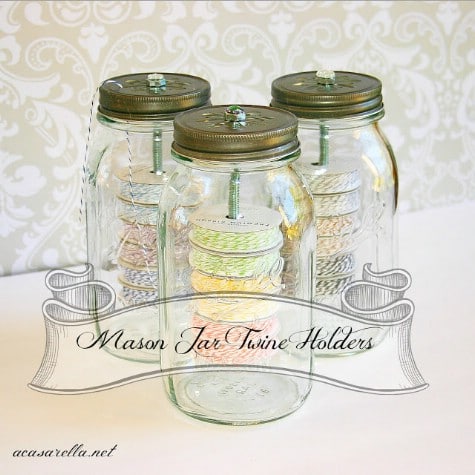
Or … use a Mason jar.
If you are up for a more elaborate project and you have a lot of different spools of twine to store, you will definitely want to check out this Mason jar twine holder project! You can do this for the wider spools.
You need to thread a bolt through the top of the lid so that you can put the spools on something, and then you need to cut openings in the top of the lid, unless you can find one like this which already includes them.
Pull the ends of the different twines out through each of the openings, because it allows you to use a single jar to access half a dozen spools of twine. They also look kind of pretty. Great idea, and the tutorial is detailed and easy to follow!
DIY Instructions and Project Source: Acasarella
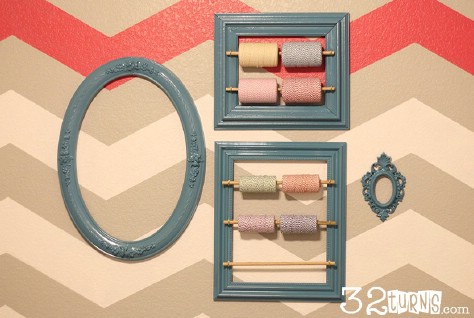
Store twine using a picture frame.
If you want yet another clever and pretty solution for storing and using your twine, you can use an old picture frame or the frame from an old mirror. Attach cup hooks to the frames to hold wooden dowels, and then slide your twine onto the wooden dowels.
DIY Instructions and Project Source: 32turns
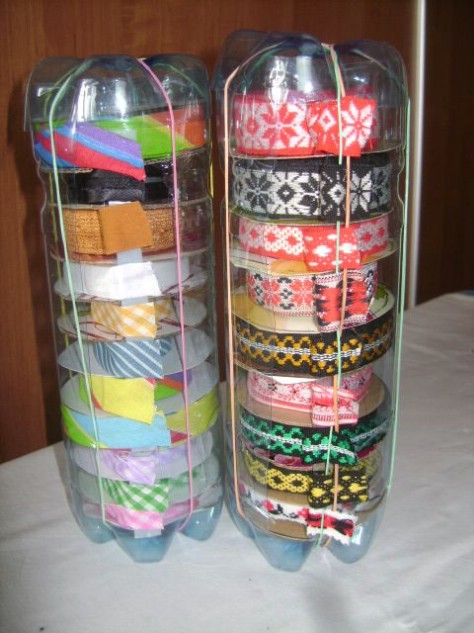
Use old plastic bottles to store ribbon, twine, or whatever else.
While this is not the neatest solution, it works, and it looks like it probably works well. Just cut old plastic bottles so that you can pull the ribbons out and then rubber band them together.
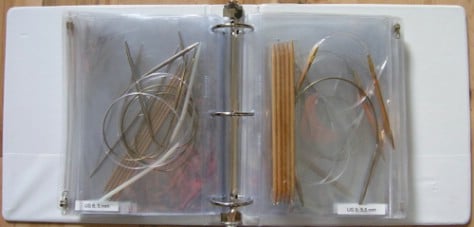
Store knitting needles in a binder.
Storing knitting needles and sewing needles is such a pain! They just love to get lost! It’s no fun digging around in the bottom of your sewing basket to find them when you want to get to work.
Here’s an alternative. Get a binder with sheet protectors, and store your knitting needles inside, backed by card stock. Use the card stock to conveniently label them in case you tend to mix them up.
This solution is perfect for staying organized, and it also has the benefit of being portable. You can take your knitting needles with you wherever you go; I think this would be perfect for travel.
http://childsfamily.com/knitting/?p=160
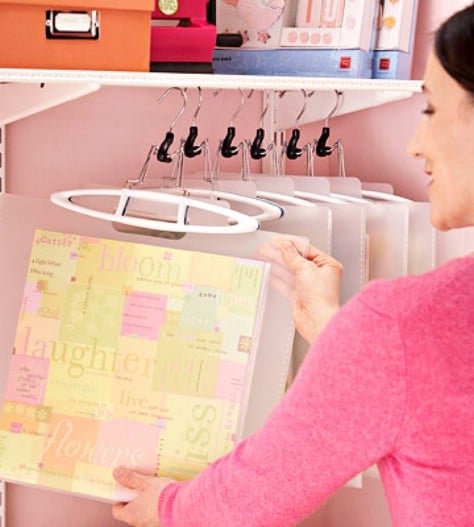
Hang your scrapbooking supplies in a closet.
Have an unused closet space? It may just be perfect for your scrapbooking supply storage! In this photo you see an easy solution for hanging scrapbooking supplies so that they stay neat and flat.
DIY Instructions and Project Source: Bhg
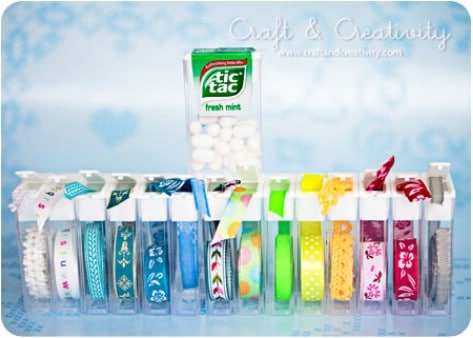
Use tick Tic Tac containers for ribbons.
If you enjoy Tic Tacs, save the containers and use them to store ribbons, trim, lace, washi tape, and so on. A very cute solution and one which you can use for a lot of different supplies!
DIY Instructions and Project Source: Prettyprudent
Store documents in a notebook.
This is a very simple idea, but I certainly never thought of it. Attach a folder inside a notebook and you can store documents in it. This one is a travel notebook for storing copies of insurance paperwork, memorabilia, ticket stubs, and so on.
It would be great for more than just travel, however. Imagine bringing it with you to the craft store and using it to store samples of fabric, ribbon, and so on that you are thinking of purchasing for future projects, and then taking notes about the projects inside. There are really a thousand ways this could be useful!
Organize Your Kids’ Stuff
Finally, one more area of home living which can be a challenge and a half to keep organized is children’s stuff. Your kids’ bedrooms and playroom can be impossible to keep clean at the best of times. But with these clever storage ideas, you can help your kids to keep neat and tidy.
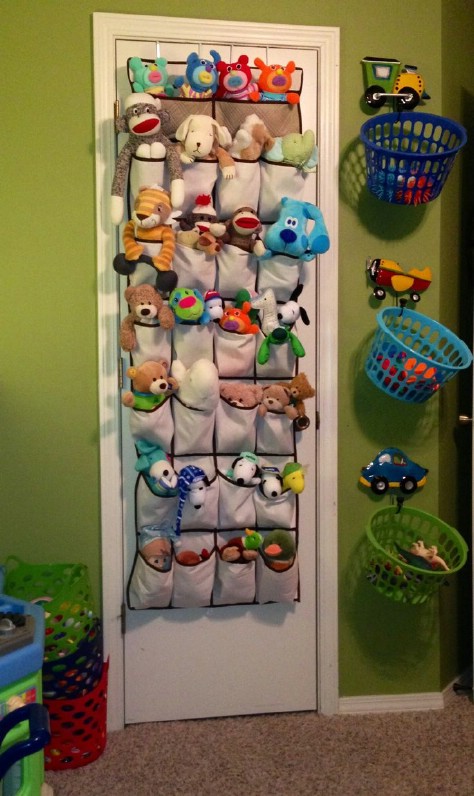
Store plush toys using a shoe organizer.
I can’t resist showing you all yet another shoe organizer. I know, it’s like the third one, right? But you have to see how great it works for storing plush animals! Each animal gets its own compartment.
You could also store several small ones in a single compartment—great for keeping them from getting misplaced. They look so cute and happy in those compartments too!
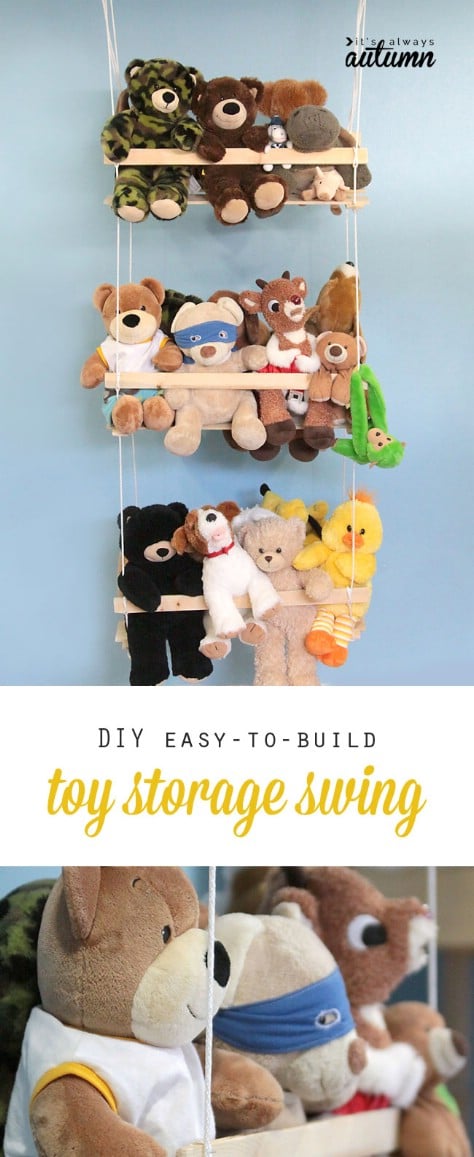
Build a plush animal “swing.”
This is a cute DIY storage project with a clever theme. You create a “swing” with different levels which actually functions as a storage shelf for plush animals, and you hang it in your child’s bedroom or playroom. Once again, this is a solution I like both because it offers effective storage and because it’s so cute. Once again, these look like happy stuffed animals.
DIY Instructions and Project Source: Itsalwaysautumn
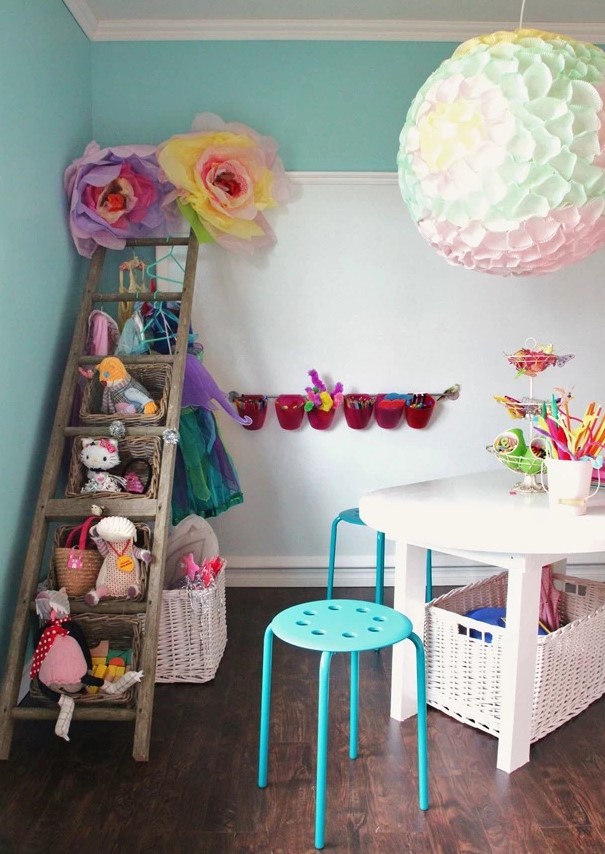
Use a ladder with baskets to store stuffed animals and other toys.
Here is another tiered solution to plush animal storage. Old ladders like this one are great for use all around the house. They have a lovely rustic look, and there are so many ways you can convert hem into shelving. I like how the upper rungs are being used on the other side to hang clothing, so the ladder is actually filling dual purposes.
Another way you can do it is to get one of those step ladders which you can fold and unfold. Unfold it, and then fit wood planks through the rungs to create flat shelves. That actually provides you with even more storage space.
DIY Instructions and Project Source: Hgtv
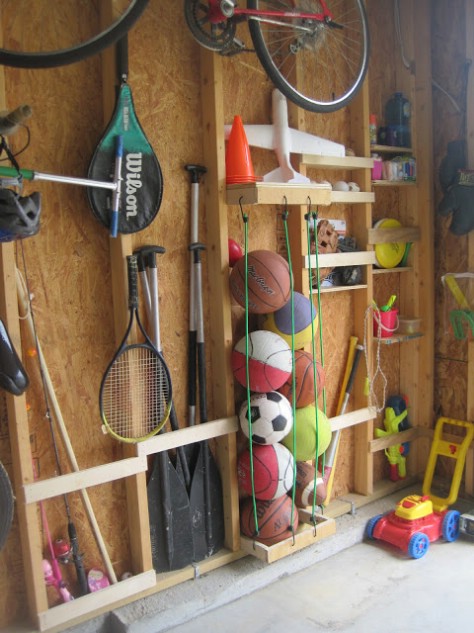
Try some bungee cord storage.
This blog post shows you how you can use bungee cords in your garage to corral balls so they don’t roll around everywhere. They take up a lot less space this way than they would in a box, and they are all actually much easier to reach, making this a more convenient solution.
DIY Instructions and Project Source: Designedtodwell
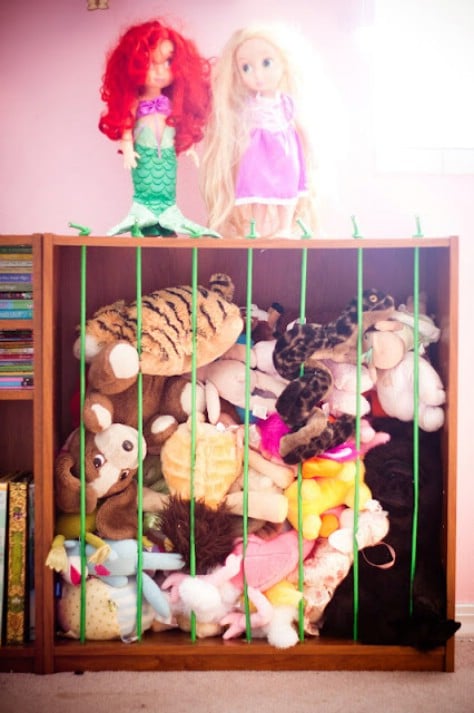
This bungee solution isn’t just great for balls, it is also great for other types of toys too. Here at The Giggle Garden, you can view a detailed tutorial for how you can create a similar bungee solution for storing plush animals. The idea is based on a specialized item of furniture which can easily run you $150 or more if you buy it from the store. This solution on the other hand barely costs you anything; you can buy four bungee cords for around $10. Here’s what the finished project looks like:
DIY Instructions and Project Source: Akgriffiths
Store bath toys the easy way.
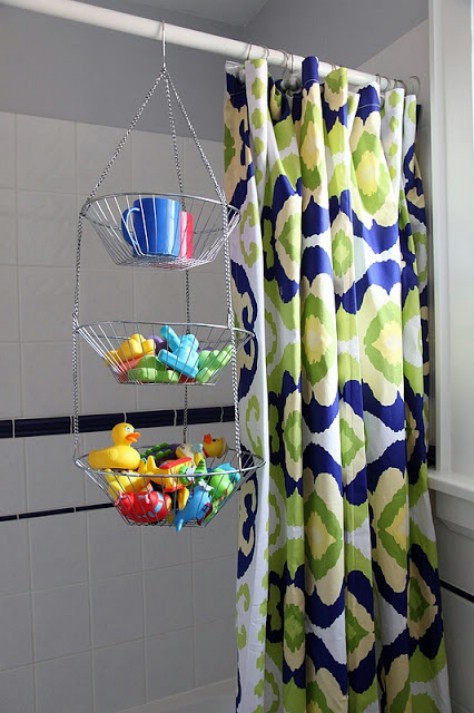
Tired of bath toys being strewn all over the bathtub, countertops, and cabinets? One easy way to corral them and keep them out of the way but still easy to reach is with a hanging fruit basket. I also like this as an all-purpose shower storage solution. Note the cups in the top basket—you could also use this to store soap, shampoo, etc.
DIY Instructions and Project Source: 8footsix.com
Repurpose a plant hanger for children’s toys.
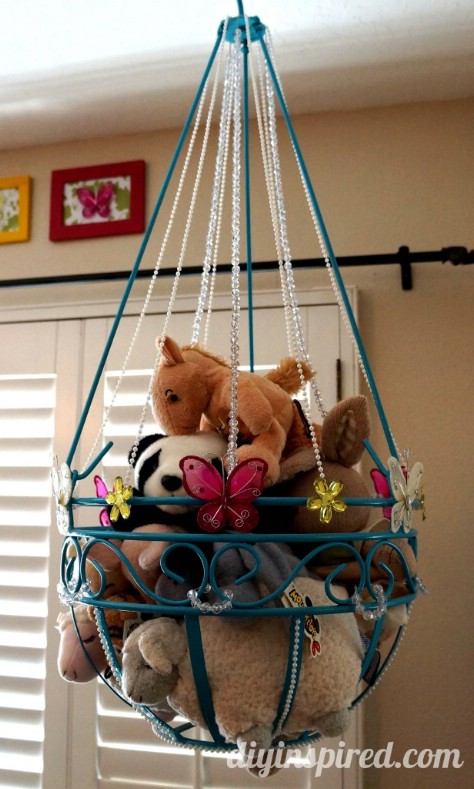
Here is a similar idea for storing more children’s toys. Instead of a fruit basket, use a plant hangar. Just skip putting a pot in it, and it turns out to be perfect for holding stuffed animals.
Solutions like these free up wall space and floor space. If you hang it over a bed, it should still be easy for your child to reach.
This particular plant hangar has been painted and embellished with beads and butterflies. Definitely be sure to check out the post over on DIY Inspired to see the original and how it was transformed. It’s hard to believe that this toy holder actually started its existence as an old metal plant hangar discovered by the trash!
DIY Instructions and Project Source: Diyinspired
Keep game board pieces in their places.
Board games are a lot of fun, but keeping track of all the little cards and pieces that come with them? Not so fun, and not so easy either, especially when they start winding up in the wrong boxes or scattered across the floor. This is definitely the easiest solution I have seen yet.
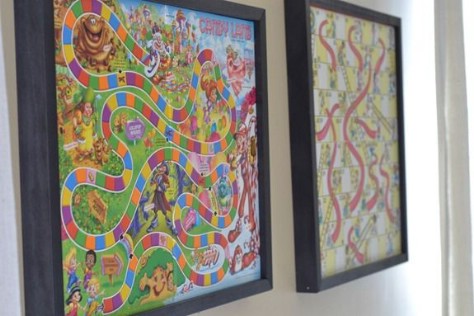
Simply store all those pieces in a plastic bag and then affix the bag to the back of the game board. That ensures that everything will stay together even if you don’t keep the boxes (which after all take up a lot of space).
You’ll also notice that this blogger took things a step further by framing the boards and reinforcing them so they can hang on the wall and double as art. These boards are a lot stronger than they were originally and should stay in excellent shape over the years.
This is a wonderful way to preserve vintage games.
DIY Instructions and Project Source: Infarrantlycreative
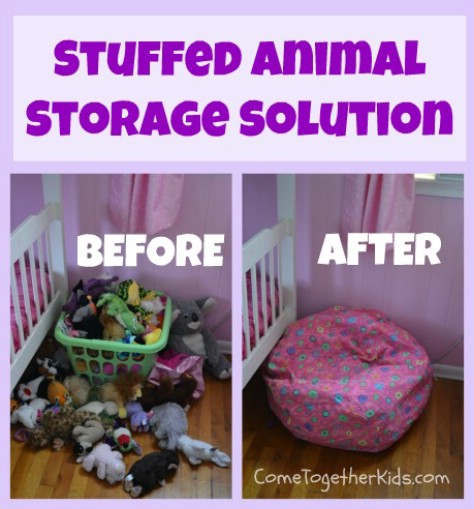
Store plush animals in a bean bag cover.
You know those bean bag chairs that kids love? You can purchase covers for them separately, and they aren’t too expensive if you shop around—around $10 if you get a nice deal (they can cost a lot more if you just buy the first one you see).
They are great for storing stuffed animals! You just stuff them all inside, and then close the bag so they are contained. It looks nice and neat, and you no longer have to worry about stuffed animals being strewn underfoot. Accessing them is easy; just open the bag.
As a plus, if you don’t overfill it, the bag can actually be used as a bean bag chair. As you can see, Laura’s daughter on Come Together Kids really enjoys it! What a great idea, and so easy to do!
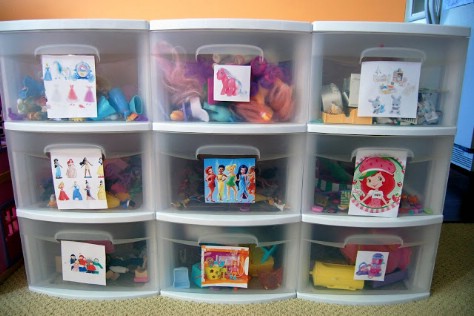
Put pictures on plastic bins so that children understand where to put their toys.
Young children tend to be visual and are more likely to understand images than words. One great way to help your kids figure out where their toys are supposed to go is to label the plastic bins you use in the toy room with colorful print-outs. This blogger just went with Google images for this project. It would be even better if you also included words. That way children could learn where toys go from the pictures, but also start learning the words by pairing the words with the images.
DIY Instructions and Project Source: Familyeverafterblog
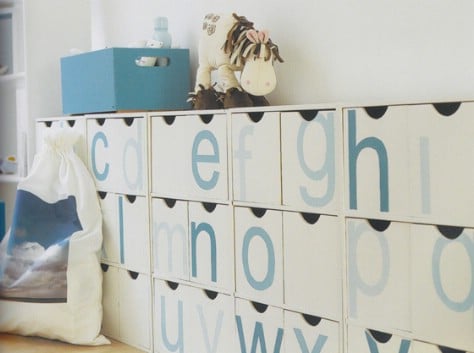
Label cubbies or bins with letters so children can learn.
Just as pairing words with images in the solution above would help children learn about reading, this is another great idea for the same!
DIY Instructions and Project Source: Projectnursery
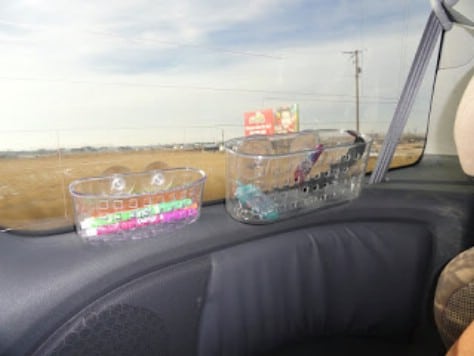
Organize kids’ stuff (or your stuff!) on a road trip.
Road trips can be fun, but they can also be stressful and messy! Keep your next road trip with the kids less stressful and messy with this simple solution. You know those shower cubbies with suction cups?
Those are perfect for road trips, because you can stick them to the windshield on the dashboard and you don’t have them rolling around. You can use them to store kids’ toys or other useful supplies while you are driving!
DIY Instructions and Project Source: Mosermoments1
Display your kids’ artwork on clipboards.
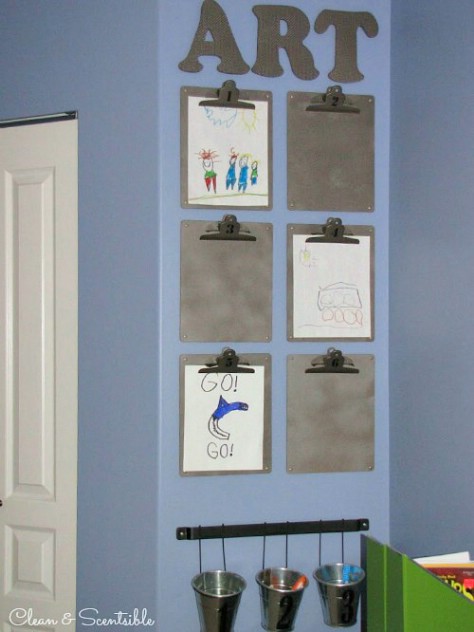
I love this idea, because organizing kids’ artwork can be a challenge. If you have a child going through an artistic phase, he or she will often present you with a new picture every day. This wall display with clipboards makes it easy to display kids’ artwork and regularly change the display.
If you have more than one kid, you could put each child’s art on a separate clipboard and even just put one picture on top of another for a while.
Then you will have nice, neat stacks of each child’s creations which you can put in a folder. And you’ll never again have to worry about your child asking, “What did you do with the picture I gave you last month?”
DIY Instructions and Project Source: Cleanandscentsible
Organize the Garage or Tool Shed
Garages and tool sheds are notorious for being messy! Between auto equipment, sports equipment, bicycles, skateboards, tools, and parts, it can feel next to impossible to keep them in order. Here are some clever storage hacks that will help you clean up and turn your garage or tool shed back into a usable space!
Create a “pincushion” for your tools.
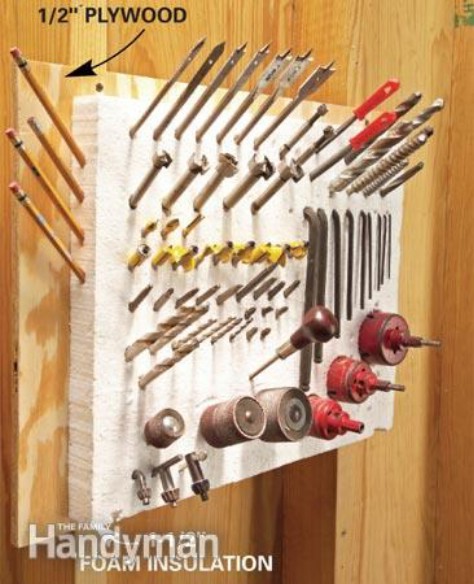
The Family Handyman has a lot of awesome ideas for storage in the garage. One of them is creating a “pincushion” for your drill bits, screwdrivers, wrenches, and so on.
You do it by gluing foam onto a piece of plywood and then hanging it on the wall. Punch in holes that are the right sizes for your tools. Mount it on the wall and you are good to go.
DIY Instructions and Project Source: Familyhandyman
Another great variation on this idea is to store foam inside a plastic tote with a lid. Punch holes in it the same way you did for the project above, and you can use it to store your rotary bits. This solution of course has the advantage of being portable.
DIY Instructions and Project Source: Familyhandyman
Mount paint swatches on a hook.
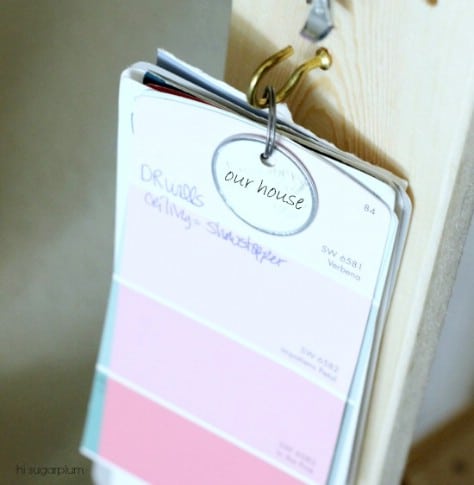
Paint swatches are wonderful things. Many people like to save them for future reference, and some people like to save them because they’re pretty (there are a lot of crafts you can make with them). How can you keep them all organized and neat? Just mount a hook for them somewhere in your garage or tool shed.
DIY Instructions and Project Source: Hisugarplumsblog
Recycle your tin cans.
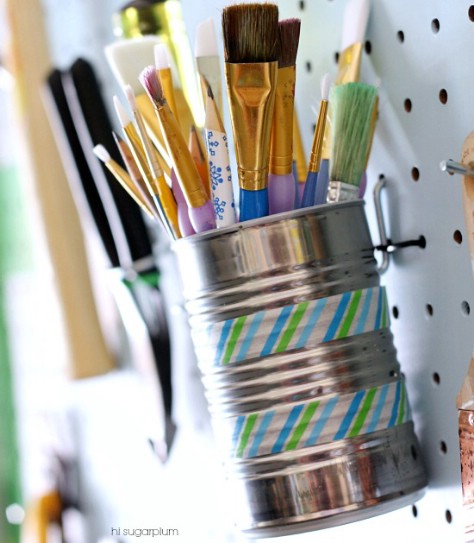
Another idea from the same blog that I like is using old tin cans to store supplies. As you can see, it is easy to mount them to a pegboard right next to your other tools. She has decorated this one with washi tape so that it’s pretty to look at.
DIY Instructions and Project Source: Flickr
Use a belt rack for your wrenches.
What’s the easiest way to store wrenches? The Family Handyman has another great trick here—use a belt rack or tie rack! Just hang it on the wall, and you can hang your wrenches the same way you would your belts.
DIY Instructions and Project Source: Familyhandyman
Get these adorable tennis balls to hold your keys and other loose items.
I just can’t get over the extreme cuteness of this idea! Just grab a box cutter and cut little “mouths” into the tennis balls and add a set of eyes over the mouth.
The tennis balls can hold keys, cash, mail, and other items. You can leave them lying on a desk or you can tack them to a wall. This would be especially adorable for leaving reminders and things for your kids on their way out the door to school. So I would think of putting it not only in a garage, but also in a mudroom or family command center.
DIY Instructions and Project Source: Pgeveryday
We hope that you enjoyed all these clever storage hacks for storing small items throughout your house! Have any favorite storage solutions we missed for the kitchen, the playroom, the garage, the craft room, or any other area in the house? Tell us all about it in the comments below!





Leave a Reply