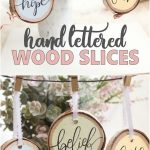
I love rustic DIY wood projects, and I love decorating for holidays. This year, I wanted to add some new rustic-looking ornaments to my Easter decorations, and these hand-lettered wood slices are perfect. These are beautiful wooden ornaments that have the words Faith, Hope, and Belief on them. They're perfect for your Easter tree or just for hanging anywhere in the house.
Jump to:
What You Need To Make These Wood Slice Ornaments
To make these lovely ornaments, you will need:
- Wood Slices – You can get these on Amazon or at your favorite craft store
- Pencil
- Paint
- Black Marker
- Ribbon
How To Make The Easter Wood Slice Ornaments
This is an effortless project, and it's the perfect DIY Easter ornament if you love rustic decorations. Trace the words using the pencil, and then paint – It's a bit more complicated than that, but you get the idea. See the complete instructions below!
Can You Make Your Own Wood Slices?
If you have the tools, you can absolutely make your own wood slices. I don't have the necessary tools, so I just got my slices from Amazon. They're pretty inexpensive, and you get around 30 in a pack. That gives you plenty to make these for yourself and some to give out as gifts, too!
Where To Display These Easter Lettered Wood Slices
These are gorgeous hanging from the mantel, or you could make more than three and use them to decorate a lovely rustic Easter tree. Pair them with these DIY rustic Easter centerpiece to really create a dramatic farmhouse looking Easter display. Or, add them to your Easter wreath. The possibilities are endless!
Easter Hand Lettered Wood Slices
Video tutorial:
Materials Needed (for 3 ornaments):
- 3 round wood slices such as birch, about 3” across, ⅜’ thick with a hole drilled in the top
- Pencil
- DecoArt Americana Chalky Finish paint in Serene, New Life, Rejuvinate
- Flat paintbrush
- Fine tip black permanent marker or brush pen (such as the Tombow Fudenosuke Brush Pen)
- Decorative ribbon of your choice, ⅛” wide – or twine if you want a really rustic ornament
Instructions:
1. Plan out the positioning of your lettering by tracing the outline of the wood slices onto a piece of paper.
2. Draw in the inner border of where the paint will end.
3. Using the template as a guide or lettering style of your choice, practice writing the phrases (such as "faith," "hope,” and “belief”) onto the paper. Make any corrections until you are happy with the design. Set aside.
4. Paint the surface of each wood slice with different colored paint, leaving a small border of unpainted wood on the outer edge. Let dry and then repeat on the other side if desired.
5. With a pencil, copy the phrase from the practice sheet onto each wood slice. Make any corrections as needed until you are happy with the designs.
6. Carefully trace over the pencil marks with the fine-tip black marker/ brush pen.
7. Go back and thicken all the "down strokes" on the letters, leaving the "upstrokes" thinner.
8. Let dry at least overnight before carefully erasing any pencil marks (don’t proceed if the marker smudges at all).
9. Add ribbon for hanging.
How much do you love rustic DIY Easter decorations?


Leave a Reply